# Muppy Documentation (Full)
> Complete documentation concatenated for LLM ingestion.
================================================================================
# Home
Source: index.md
================================================================================
# Muppy Documentation
Muppy manages infrastructure the way you would manage it by hand, only written down and
repeatable. It connects over SSH to the **Hosts** you enrol, runs **Tasks** on them, and
collects **Facts** back. Everything else on this site is built on those three objects.
New here? Read [Muppy Concepts](concepts.md) first — five minutes, and the rest of the site
stops being a glossary problem.
## Choose your path
- :material-server: **Run servers**
Enrol a Host, run Tasks on it, manage its services, its firewall and its SSH keys.
[Muppy Core](muppy_core/index.md)
- :material-database: **Run PostgreSQL**
Clusters, backups and restores, replication sets, High Availability, point-in-time
recovery.
[PostgreSQL Guides](guides/postgresql/index.md)
- :material-application-braces: **Run Odoo applications**
App Definitions, CI/CD from your git pushes, dev / test / staging / production servers,
and a browser IDE on each.
[Odizy](odizy/index.md)
- :material-kubernetes: **Run Kubernetes**
Clusters, packages and releases, metapackages, and multi-cloud High Availability with
Pack8s.
[Muppy K8s](muppy_k8s/index.md)
- :material-rocket-launch: **Ship an app on Manganese**
Pick an App Definition, describe your build in `mpy_setup.sh` and your processes in
`services.yml`, push.
[App Servers](app_servers/index.md)
- :material-cog: **Configure the instance**
Users, S3 buckets, credentials, and the notification channels the queues use.
[Configuration](configuration/index.md)
## Also here
| | |
|---|---|
| [Muppy Enterprise](muppy_enterprise/index.md) | Muppy deployed inside your own infrastructure. |
| [OVH Public Cloud](ovh/index.md) | Commissioning and importing OVH instances. |
| [User Guides](user_guides/restic-backup-restore.md) | Task-sized how-tos: Restic backups, lock monitoring, script-type Tasks. |
| [Muppy Manganese](muppy_manganese/designing-your-mgx.md) | Designing an mgx, environment variables, plans, sharing a database. |
!!! tip "Reading this with an agent"
Every page is also served as raw markdown, and the whole site as a single file. See
[Using This Doc with an AI Agent](using-with-an-agent.md) for the URLs and what to
hand your agent.
================================================================================
# Muppy Concepts
Source: concepts.md
================================================================================
# Muppy Concepts
Muppy connects over SSH to **Hosts** in order to run **Tasks** (installation or configuration
procedures) and to collect **Facts**.
Muppy is modular: Tasks are published in **Addons** that are installed as needed.
## Hosts
A **Host** is any machine Muppy manages: a bare-metal server, a VM, or an LXC container.
Enrolling a Host is what gives Muppy the SSH access it needs to run Tasks on it.
Hosts are reached from **Muppy / Hosts**. See [Hosts](muppy_core/hosts/index.md) for
enrollment and day-to-day management.
## Tasks and Facts
**Tasks** are:
- installation or configuration procedures written in Python,
- grouped into **Scripts** (one Script = one Python module),
- *exposed* in the Muppy user interface, so any kind of user can launch or schedule them,
- executed through a job system that traces every execution and keeps a running log of
everything the Tasks did,
- **debuggable** and concise — they need far less code than the equivalent shell commands.
A Task is declared in Python with the `@fabric_task` decorator; the corresponding
`mpy.task` and `mpy.script` records are generated by the synchronisation sweep rather than
written by hand. See
[Task and Script Synchronisation](muppy_core/tasks-fact-collectors/task-script-sync.md).
**Facts** are configuration data that Tasks need in order to run — for example
`POSTGRESQL_INSTALLED_VERSIONS`. Facts are collected by running a particular kind of Task,
the **Fact Collectors**.
See [Tasks & Fact Collectors](muppy_core/tasks-fact-collectors/index.md).
## Addons and Apps
Muppy is modular. Tasks are published in **Addons** that can be installed independently.
Beyond Tasks, an Addon can also implement user interfaces and monitoring automation — such
an Addon is called a **Muppy App**. Muppy's PostgreSQL features, for instance, ship as
Muppy Apps.
**Muppy Enterprise** customers and **Muppy Partners** can implement their own Addons and
Muppy Apps.
================================================================================
# Using This Doc with an AI Agent
Source: using-with-an-agent.md
================================================================================
# Using this documentation with an AI agent
Every page of this site is published twice: as the HTML you are reading, and as the raw
markdown it was written from. An agent reads the markdown — no scraping, no HTML stripping.
## Three ways in
| You want | Fetch |
|---|---|
| one page | that page's `.md` URL |
| the list of every page | [`/llms.txt`](https://docs.muppy.io/llms.txt) |
| the whole site in one file | [`/llms-full.txt`](https://docs.muppy.io/llms-full.txt) |
This follows the [llms.txt convention](https://llmstxt.org/).
## One page
Take the page's URL, drop the trailing slash, add `.md`:
```
https://docs.muppy.io/muppy_manganese/services-yml-guide/ ← the page
https://docs.muppy.io/muppy_manganese/services-yml-guide.md ← its markdown
```
```bash
curl -s https://docs.muppy.io/muppy_manganese/services-yml-guide.md
```
### Pages that open a section
A page that opens a section — `/app_servers/`, `/muppy_k8s/`, `/guides/postgresql/` — is
written as an `index.md` inside its own directory, and its markdown stays there. The rule
above would send you one level too high:
```
https://docs.muppy.io/app_servers/ ← the page
https://docs.muppy.io/app_servers/index.md ← its markdown
https://docs.muppy.io/app_servers.md ← 404, this file does not exist
```
25 of the 142 pages are of that kind. If a `.md` URL returns 404, append `index.md` to the
page URL instead of replacing the trailing slash.
Better still, don't derive URLs at all: **every link in `llms.txt` is exact**, section pages
included.
Your browser may download the `.md` instead of displaying it. That is the browser, not the
site — `curl` shows it, and an agent reads it either way.
## The index — `llms.txt`
A 15 KB markdown index: the site's name, one line on what Muppy is, then a link to the
markdown of all 141 pages. Give an agent this URL and it can pick what it needs.
```bash
curl -s https://docs.muppy.io/llms.txt
```
## Everything — `llms-full.txt`
Every page concatenated, each behind a banner naming its title and source path. About
580 KB — roughly 145,000 tokens.
That fits a large-context model in one shot. It does **not** fit a small one: use
`llms.txt` there and fetch the handful of pages that matter.
## What to say to an agent
Paste a URL and the question:
> Read https://docs.muppy.io/llms.txt, then tell me how to schedule a
> PostgreSQL backup in Muppy.
> Read https://docs.muppy.io/llms-full.txt. My App Server's build fails in
> `mpy_setup.sh` — what stage runs when, and what environment variables can I read?
Agents that browse the web fetch these directly. For one without web access, `curl` the
file and paste it in.
!!! tip "Claude Code on an App Server"
An App Server's browser IDE ships with Claude Code, which fetches URLs itself. Point it
at `llms.txt` and let it pull the pages it needs — cheaper than pasting the whole site
into the conversation.
================================================================================
# PostgreSQL Activity & Locks Monitoring
Source: user_guides/postgresql-lock-monitoring.md
================================================================================
# PostgreSQL Activity and Locks Monitoring
## Overview
PostgreSQL uses locks to manage concurrent access to database resources. When multiple transactions try to access the same data, locks ensure data integrity by controlling access order. However, locks can also cause performance issues when queries wait too long for resources held by other transactions.
Muppy provides three monitoring tools to help diagnose and resolve PostgreSQL locking and activity issues:
| Tool | Purpose | When to Use |
|------|---------|-------------|
| **Lock Monitor** | View ALL locks in the cluster | Investigating overall lock activity, finding what's holding locks |
| **Blocking Lock Monitor** | View ONLY blocking situations | Diagnosing deadlocks or blocked queries |
| **pg_stat_activity Monitor** | View all backend connections | Analyzing connection states, finding idle transactions |
### Decision Guide: Which Tool to Use?
- **Application seems slow?** Start with **pg_stat_activity Monitor** to see active queries
- **Query is stuck waiting?** Use **Blocking Lock Monitor** to find what's blocking it
- **Need to understand lock patterns?** Use **Lock Monitor** to see all locks
- **Too many connections?** Use **pg_stat_activity Monitor** to identify and terminate idle connections
---
## Key PostgreSQL Concepts
### Lock Types
PostgreSQL has several lock types depending on what resource is being locked:
| Lock Type | Description |
|-----------|-------------|
| `relation` | Locks on tables |
| `transactionid` | Locks on transaction IDs |
| `virtualxid` | Locks on virtual transaction IDs |
| `tuple` | Locks on specific rows |
| `object` | Locks on database objects |
| `advisory` | Application-controlled locks |
### Lock Modes (from weakest to strongest)
| Mode | Conflicts With | Typical Operations |
|------|----------------|-------------------|
| `AccessShareLock` | AccessExclusiveLock | SELECT |
| `RowShareLock` | Exclusive, AccessExclusive | SELECT FOR UPDATE/SHARE |
| `RowExclusiveLock` | Share, ShareRowExclusive, Exclusive, AccessExclusive | INSERT, UPDATE, DELETE |
| `ShareUpdateExclusiveLock` | ShareUpdateExclusive, Share, ShareRowExclusive, Exclusive, AccessExclusive | VACUUM, ANALYZE |
| `ShareLock` | RowExclusive, ShareUpdateExclusive, ShareRowExclusive, Exclusive, AccessExclusive | CREATE INDEX |
| `ShareRowExclusiveLock` | RowExclusive, ShareUpdateExclusive, Share, ShareRowExclusive, Exclusive, AccessExclusive | - |
| `ExclusiveLock` | RowShare, RowExclusive, ShareUpdateExclusive, Share, ShareRowExclusive, Exclusive, AccessExclusive | - |
| `AccessExclusiveLock` | ALL modes | DROP TABLE, ALTER TABLE, TRUNCATE |
### Granted vs Awaited Locks
- **Granted = True**: The process holds the lock
- **Granted = False**: The process is waiting for the lock
### Blocked vs Blocking
- **Blocked process**: A query that is waiting because another transaction holds a conflicting lock
- **Blocking process**: A query that holds a lock that another transaction is waiting for
---
## Accessing the Monitoring Tools
1. Navigate to **Databases > PostgreSQL > Database Clusters**
2. Select a cluster to open its form view
3. Click the **Action** dropdown menu
4. Choose one of:
- **Monitor Database Locks** - Opens Lock Monitor
- **Monitor Database Blocking Locks** - Opens Blocking Lock Monitor
- **Monitor Cluster Activity** - Opens pg_stat_activity Monitor
---
## Lock Monitor
### Purpose
The Lock Monitor displays ALL locks currently held or awaited in the PostgreSQL cluster. Use this tool when you need a comprehensive view of lock activity.
### How It Works
The monitor queries the `pg_locks` system view joined with `pg_stat_activity` to show lock information alongside the queries holding them.
### Key Fields
| Field | Description |
|-------|-------------|
| **PID** | Process ID of the backend holding/awaiting the lock |
| **Lock Type** | Type of lock (relation, transactionid, etc.) |
| **Relation** | Name of the table being locked (if applicable) |
| **Mode** | Lock mode (AccessShareLock, RowExclusiveLock, etc.) |
| **Granted** | True if lock is held, False if waiting |
| **Query Duration** | How long the current query has been running |
| **Query** | The SQL query text |
| **State** | Backend state (active, idle, idle in transaction) |
| **Application Name** | Name of the connected application |
| **Client Address** | IP address of the client |
### Using the Lock Monitor
1. **Refresh**: Click **Refresh** to update the lock list with current data
2. **Filter by Database**: Select a database to show only locks for that database
3. **Group By**: Use the search bar groupings to organize locks by:
- PID
- User
- Database
- Lock Type
- Mode
- Relation
4. **Pause Auto-Refresh**: Apply the "Don't Refresh" filter to prevent automatic updates
5. **Custom Query**: Click the **Query** tab to view or modify the SQL query used
### SQL Query Used
```sql
SELECT
pgl.pid,
pgl.locktype,
pgl.database AS database_oid,
pgsa.datname AS database_name,
pgl.relation::regclass AS relation_name,
pgl.mode,
pgsa.usename AS user_name,
pgsa.application_name,
pgsa.client_addr,
now() - pgsa.query_start AS query_duration,
pgsa.query,
pgsa.state,
pgl.granted,
-- ... additional fields
FROM pg_locks AS pgl
LEFT JOIN pg_stat_activity AS pgsa ON pgl.pid = pgsa.pid
ORDER BY (now() - pgsa.query_start) DESC;
```
---
## Blocking Lock Monitor
### Purpose
The Blocking Lock Monitor shows ONLY situations where one query is blocking another. This is the most useful tool when diagnosing performance issues caused by lock contention.
### How It Works
The monitor identifies lock conflicts by finding locks that are NOT granted (`NOT blockedl.granted`) and joining with the locks table again to find which process holds the conflicting lock.
### Key Fields
| Field | Description |
|-------|-------------|
| **Locked Item** | The table or resource being contested |
| **Waiting Duration** | How long the blocked query has been waiting |
| **Blocked PID** | Process ID of the waiting query |
| **Blocked Query** | SQL text of the waiting query |
| **Blocked Mode** | Lock mode requested by the blocked query |
| **Blocking PID** | Process ID of the query holding the lock |
| **Blocking Query** | SQL text of the query holding the lock |
| **Blocking Mode** | Lock mode held by the blocking query |
### Using the Blocking Lock Monitor
1. **Refresh**: Click **Refresh** to get current blocking situations
2. **Analyze**: Look at both the blocked and blocking queries to understand the conflict
3. **Decide**: Determine which query should be terminated (usually the blocking one)
4. **Act**: Use one of the terminate buttons
### Terminate Buttons
Each blocking situation has two terminate options:
| Button | Action | When to Use |
|--------|--------|-------------|
| **Terminate backend of BLOCKING pid** | Kills the process holding the lock | When the blocking query is stuck or less important |
| **Terminate backend of BLOCKED pid** | Kills the process waiting for the lock | When the waiting query should be cancelled |
### SQL Query Used
```sql
SELECT
COALESCE(blockingl.relation::regclass::text, blockingl.locktype) AS locked_item,
now() - blockeda.query_start AS waiting_duration,
blockeda.pid AS blocked_pid,
blockeda.query AS blocked_query,
blockedl.mode AS blocked_mode,
blockinga.pid AS blocking_pid,
blockinga.query AS blocking_query,
blockingl.mode AS blocking_mode,
-- ... client info fields
FROM pg_catalog.pg_locks AS blockedl
JOIN pg_stat_activity AS blockeda ON blockedl.pid = blockeda.pid
JOIN pg_catalog.pg_locks AS blockingl ON (
(blockingl.transactionid = blockedl.transactionid)
OR (blockingl.relation = blockedl.relation AND blockingl.locktype = blockedl.locktype)
) AND blockedl.pid != blockingl.pid
JOIN pg_stat_activity AS blockinga ON blockingl.pid = blockinga.pid
WHERE NOT blockedl.granted
ORDER BY blockeda.query_start;
```
---
## pg_stat_activity Monitor
### Purpose
The pg_stat_activity Monitor shows all PostgreSQL backend connections and their current state. Use this tool to:
- Find long-running queries
- Identify "idle in transaction" connections
- Monitor overall database activity
- Terminate problematic connections in bulk
### Key Fields
| Field | Description |
|-------|-------------|
| **PID** | Process ID of the backend |
| **Backend Type** | Type of backend (client backend, autovacuum, etc.) |
| **Database** | Database name |
| **Username** | Connected user |
| **Application Name** | Application identifier |
| **Client Address** | IP address of the client |
| **State** | Current state (active, idle, idle in transaction, etc.) |
| **State Age** | Time elapsed since last state change |
| **Wait Event Type** | What the backend is waiting for (if any) |
| **Query** | Current or last executed query |
### Backend States
| State | Description | Action |
|-------|-------------|--------|
| `active` | Executing a query | Monitor if running too long |
| `idle` | Waiting for new command | Generally safe |
| `idle in transaction` | In transaction but not executing | **Dangerous** - holds locks! |
| `idle in transaction (aborted)` | In failed transaction | Should be terminated |
### Using the pg_stat_activity Monitor
1. **Ignore Idle Connections**: Toggle the checkbox to hide idle connections (enabled by default)
2. **Filter by Database**: Select a specific database to narrow results
3. **Group By**: Organize by state, database, or client
4. **Bulk Terminate**: Select multiple records and use "Terminate Backends" action
### SQL Query Used
```sql
SELECT
pid,
backend_type,
datname,
usename,
application_name,
client_addr,
state,
now() - state_change AS state_age,
wait_event_type,
wait_event,
query
FROM pg_stat_activity
ORDER BY state_age DESC;
```
---
## Terminating Processes
### How pg_terminate_backend() Works
When you click a terminate button, Muppy executes:
```sql
SELECT pg_terminate_backend()
```
This gracefully terminates the specified backend:
- The connection is closed
- Any open transaction is **rolled back**
- The client receives an error about the terminated connection
### Choosing Which Process to Terminate
| Scenario | Recommended Action |
|----------|-------------------|
| Blocking query is stuck/hung | Terminate the **blocking** PID |
| Blocking query will finish soon | Wait, or terminate the **blocked** PID |
| "idle in transaction" holding locks | Terminate that PID |
| Long-running query not needed | Terminate that PID |
| Multiple idle connections | Use bulk terminate in pg_stat_activity |
### Warnings
- **Transaction Rollback**: Terminating a backend rolls back its transaction. Any uncommitted changes are lost.
- **Application Impact**: The connected application will receive an error. Ensure it can handle reconnection.
- **Cascading Effects**: If a blocked query is part of a larger operation, terminating the blocker may allow many queries to proceed at once.
---
## Use Cases
### Use Case 1: Diagnosing a Slow Application
**Symptoms**: Application responses are slow, database seems unresponsive.
**Steps**:
1. Open **pg_stat_activity Monitor**
2. Uncheck "Ignore Idle Connections" to see all connections
3. Look for queries with long **State Age** in "active" state
4. Check **Wait Event Type** - if it shows "Lock", switch to Blocking Lock Monitor
5. If many connections are "idle in transaction", those may be holding locks
### Use Case 2: Resolving a Table Lock Deadlock
**Symptoms**: Queries on a specific table are stuck.
**Steps**:
1. Open **Blocking Lock Monitor**
2. Click **Refresh**
3. Identify the blocking chain:
- Note the **locked_item** (table being contested)
- Compare **blocked_query** vs **blocking_query**
4. Decide which transaction can be safely terminated
5. Click **Terminate backend of BLOCKING pid** to release the lock
### Use Case 3: Identifying "idle in transaction" Connections
**Symptoms**: Locks held for long periods, performance degradation.
**Steps**:
1. Open **pg_stat_activity Monitor**
2. Uncheck "Ignore Idle Connections"
3. Group by **State**
4. Look for "idle in transaction" entries with long **State Age**
5. These connections hold locks without doing work - terminate them
### Use Case 4: Investigating Lock Contention on a Specific Table
**Symptoms**: Operations on a particular table are slow.
**Steps**:
1. Open **Lock Monitor**
2. Group by **Relation**
3. Find your table and expand to see all locks
4. Look at lock **Mode** - AccessExclusiveLock blocks everything
5. Check **Granted** - False means waiting for lock
6. Find the PID holding the blocking lock and investigate
---
## Best Practices
### Keep Transactions Short
Long transactions hold locks longer, increasing blocking potential:
```sql
-- Bad: Long transaction holding locks
BEGIN;
UPDATE large_table SET status = 'processed';
-- ... application does other work for minutes ...
COMMIT;
-- Better: Quick transactions
BEGIN;
UPDATE large_table SET status = 'processed';
COMMIT;
-- Application does other work separately
```
### Monitor Proactively
- Check for blocking locks regularly, not just when problems occur
- Set up alerts for long-running "idle in transaction" connections
- Review lock patterns during deployments and migrations
### Coordinate DDL Operations
DDL commands (ALTER TABLE, CREATE INDEX) often require AccessExclusiveLock:
- Schedule during maintenance windows
- Use `CONCURRENTLY` when possible (e.g., `CREATE INDEX CONCURRENTLY`)
- Warn users before running DDL on busy tables
### Avoid Long-Running Idle Transactions
Applications should:
- Commit or rollback transactions promptly
- Use connection pooling with transaction-level pooling
- Set `idle_in_transaction_session_timeout` in PostgreSQL configuration
---
## Troubleshooting
| Symptom | Probable Cause | Solution |
|---------|---------------|----------|
| No locks displayed | Cluster offline or SSH unreachable | Check cluster state and connectivity |
| Query shows "idle" but holds lock | Transaction not committed | Find and terminate idle in transaction |
| Blocking Monitor empty but queries slow | No lock conflicts - other bottleneck | Use pg_stat_activity to analyze |
| Terminate button doesn't respond | PID already terminated | Refresh the monitor |
| Monitor shows stale data | Auto-refresh disabled | Click Refresh or remove "Don't Refresh" filter |
| Connection refused error | Cluster not running | Start the PostgreSQL cluster |
---
## Technical Reference
### Model References
| Model | Description |
|-------|-------------|
| `mpy.pg_lock_monitor_wizard` | Lock Monitor wizard |
| `mpy.pg_lock` | Individual lock record (transient) |
| `mpy.pg_blocking_lock_monitor_wizard` | Blocking Lock Monitor wizard |
| `mpy.pg_blocking_lock` | Blocking lock record (transient) |
| `mpy.pg_stat_activity_monitor_wizard` | Activity Monitor wizard |
| `mpy.pg_stat_activity` | Activity record (transient) |
### Source Files
- `project_addons/muppy_postgresql_base/wizards/pg_lock_monitor_wizard.py`
- `project_addons/muppy_postgresql_base/wizards/pg_blocking_lock_monitor_wizard.py`
- `project_addons/muppy_postgresql_base/wizards/pg_stat_activity_monitor_wizard.py`
### External Documentation
- [PostgreSQL Explicit Locking](https://www.postgresql.org/docs/current/explicit-locking.html)
- [pg_locks View](https://www.postgresql.org/docs/current/view-pg-locks.html)
- [pg_stat_activity View](https://www.postgresql.org/docs/current/monitoring-stats.html#MONITORING-PG-STAT-ACTIVITY-VIEW)
- [Exploring Query Locks in Postgres](https://big-elephants.com/2013-09/exploring-query-locks-in-postgres/)
================================================================================
# Task Script-Type Guide
Source: user_guides/mpy-task-script-type-guide.md
================================================================================
# Muppy Task Script-Type Guide
## Introduction
This guide explains how to create and use **script-type tasks** (`task_type='script'`) in Muppy. Script-type tasks allow you to execute shell scripts on remote hosts with automatic parameter handling, error management, and integrated logging.
### What are Script-Type Tasks?
Script-type tasks are **shell scripts stored as Jinja2 templates** that execute on remote infrastructure via SSH. They are part of Muppy's task execution framework which also includes:
- **Internal tasks**: Python functions using Fabric decorators (`@fabric_task`)
- **Inline tasks**: Shell code written directly in task definitions (future feature)
- **Script tasks**: Shell scripts executed via the `shell_task.py` module
### When to Use Script-Type Tasks vs Python Tasks
Use **script-type tasks** when:
- You need to run shell commands on remote hosts
- The logic is primarily shell-based (package installation, configuration, etc.)
- The script should be version-controlled as data (XML files)
- You want team members to edit scripts through the UI without Python knowledge
- The script doesn't require complex Python interactions
Use **Python fabric tasks** when:
- You need Python's full capabilities
- Complex data transformation is required
- You're orchestrating multiple steps with conditional logic
- You need direct Odoo ORM access within the task
---
## Architecture Overview
### Execution Flow
```
mpy.task record (XML/GUI)
↓
task.run_task() or task.invoke() [User calls task]
↓
render_task_script() [Jinja2 template evaluation]
↓
shell_task.py:run_script() [Fabric task]
↓
Fabric Connection [SSH via host credentials]
↓
Remote Host [Script execution via shell_program]
↓
Result Object [stdout, stderr, exit_code, etc.]
```
### Key Components
1. **mpy.task Model**: Stores task definitions, parameters, and script templates
2. **mpy.script Model**: References the execution script (`shell_task.py`)
3. **shell_task.py**: The Fabric task that uploads and executes scripts
4. **mpy.task_parameter**: Defines parameters available to script templates
5. **Fabric Library**: Handles SSH connection and remote execution
---
## Task Model Deep Dive
### Core Fields for Script Tasks
**File Location**: `project_addons/muppy_core/models/task.py`
#### Essential Fields:
| Field | Type | Description | Example |
|-------|------|-------------|---------|
| `name` | Char | Task name (also script filename) | `piqsty_pg_exporter_install_callback_v1.sh` |
| `description` | Text | Human-readable description | `Install Pigsty Prometheus pg_exporter binary` |
| `task_type` | Selection | Must be `'script'` | `script` |
| `script_id` | Many2one | References `mpy.script` (must be `shell_task_script`) | `muppy_core.shell_task_script__mpy_script` |
| `task_category` | Selection | Categorizes task purpose | `prometheus_exporter_install` |
| `is_system` | Boolean | System task (not user-modifiable) | `True` |
#### Script-Specific Fields:
| Field | Type | Description | Default |
|-------|------|-------------|---------|
| `shell_program` | Char | Shell interpreter to use | `bash` |
| `shell_script_username` | Char/Template | User to execute script as | Empty (uses host control user) |
| `shell_script_template` | Text | Jinja2 template containing script content | Required |
### Task Categories
Available categories define the purpose of tasks:
```python
TASK_CATEGORY_LIST = [
('host_enrollment_callback', 'Host Enrollment Callback'),
('cidr_dynamic_range_parser', 'CIDR Dynamic Range Parser'),
('prometheus_exporter_install', 'Prometheus Exporter Install Task'),
('devserver_install', 'Dev Server Install'),
]
```
### Task Parameters Model
Parameters define what data the script receives. Each parameter is a record in `mpy.task_parameter`:
| Field | Type | Purpose |
|-------|------|---------|
| `name` | Char | Parameter name (used in template) |
| `type` | Selection | `'p'` (positional) or `'n'` (named) |
| `value_type` | Char | Type: `OdooModelType`, `JSONType`, `str`, `bool`, `int`, `float`, `dict`, `list` |
| `default_value` | Char | String representation of default (for named params) |
| `default_value_is_none` | Boolean | Flag for None defaults |
| `sequence` | Integer | Parameter order |
---
## Creating Script-Type Tasks: Two Approaches
### Approach 1: GUI Method (Interactive Creation)
This is the **easiest way to get started** and allows team members without Odoo development experience to create tasks.
#### Step-by-Step GUI Workflow
1. **Navigate to Tasks Module**
- Go to: **Infrastructure → Tasks → Tasks**
- Click **Create**
2. **Fill Basic Information**
- **Name**: Enter the script filename (e.g., `my_script.sh`)
- **Description**: Brief explanation of what the script does
- **Task Type**: Select `script`
- **Script**: Select `shell_task_script` (the standard execution script)
3. **Configure Script Settings**
- **Shell Program**: Usually `bash` (default)
- **Shell Script Username**: Template for which user runs the script
- Example: `{{ params.get('server_obj').username }}`
- Leave empty to use host's control user
- **Task Category**: Choose the appropriate category
4. **Write the Shell Script Template**
- Click in **Shell Script Template** field
- Write your Jinja2 template with bash script
- Access parameters via: `{{ params.get('param_name') }}`
- Use standard Jinja2 syntax for logic
5. **Add Parameters** (One2Many field)
- Click **Add a line** in the Parameters section
- For each parameter:
- **Name**: Variable name (e.g., `server_obj`)
- **Type**: Select `Positional` or `Named`
- **Value Type**: Select the Odoo type
- **Default Value**: (for named parameters only)
- **Sequence**: Order of execution (for positional)
6. **Save and Test**
- Click **Save**
- System automatically validates XML structure
- Click **Run Task** button (if available from calling model)
#### GUI Example: Create a PostgreSQL Client Installer
**Steps:**
1. Create record with name: `install_pg_client.sh`
2. Set Shell Script Template to:
```bash
#!/bin/bash
set -e
PG_VERSION="{{ params.get('pg_version') }}"
echo "Installing PostgreSQL client version $PG_VERSION..."
sudo apt-get update
sudo DEBIAN_FRONTEND=noninteractive apt-get install -y postgresql-client-$PG_VERSION
```
3. Add one parameter:
- Name: `pg_version`
- Type: Named
- Value Type: str
- Default Value: "14"
**When to Use GUI:**
- Prototyping and testing scripts
- One-off administrative tasks
- When you want quick feedback without code deployment
- For teams without Git workflow requirement
### Approach 2: XML Data File Method (Version Controlled)
This approach stores tasks as XML data files, enabling version control and deployment automation.
#### XML File Structure
Create a file: `project_addons/my_module/data/my_tasks.xml`
```xml
my_script.sh
My awesome task description
script
devserver_install
bash
{{ params.get('host_obj').control_user_name }}
host_obj
p
OdooModelType
version
n
str
1.0
```
#### XML Pattern Conventions
**Record ID Pattern**: `{task_purpose}__{type}` followed by `__{model_name}`
```
piqsty_pg_exporter_install_callback_v1__mpy_task
install_postgresql_client__mpy_task
my_custom_deployment__mpy_task
```
**Parameter ID Pattern**: Parent task ID + `_param_` + parameter name
```
piqsty_pg_exporter_install_callback_v1__mpy_task_param_peo
install_postgresql_client__mpy_task_param_version
```
#### When to Use XML:
- Production environments
- Tasks needed for module functionality
- Tasks requiring version control
- Tasks shared across team/deployments
- Complex parameter configurations
---
## Shell Script Templates
### Template Context Variables
When Jinja2 evaluates your script template, these variables are available:
```python
context = {
'params': {
'param_name': param_value, # All positional and named parameters
'another_param': another_value,
# ...
},
'shell_script_name': 'my_script.sh', # Task name
'shell_script_username': 'postgres', # Evaluated username
}
```
### Accessing Parameters in Templates
**Simple parameter access:**
```bash
#!/bin/bash
VERSION="{{ params.get('version') }}"
echo "Installing version: $VERSION"
```
**Accessing Odoo object fields:**
```bash
#!/bin/bash
# From prometheus_exporter_obj
DOWNLOAD_URL="{{ params.get('prometheus_exporter_obj').source_url }}"
BINARY_NAME="{{ params.get('prometheus_exporter_obj').exporter_software_release_id.command_name }}"
USERNAME="{{ params.get('prometheus_exporter_obj').exporter_software_release_id.run_as_user }}"
```
**Conditional logic:**
```bash
#!/bin/bash
ENVIRONMENT="{{ params.get('environment', 'production') }}"
if [ "$ENVIRONMENT" = "development" ]; then
echo "Running in development mode"
# dev setup
else
echo "Running in production mode"
# prod setup
fi
```
**List parameters:**
```bash
#!/bin/bash
# params.packages is a list
echo "Installing packages: {{ params.get('packages') | join(' ') }}"
```
### Idempotency: Making Scripts Safe to Run Multiple Times
**Always design scripts to be idempotent**. This means running them multiple times produces the same result as running once.
**Good idempotent patterns:**
```bash
#!/bin/bash
set -e
BINARY_NAME="pg_exporter"
VERSION="{{ params.get('version') }}"
# ✓ Check if already installed
if [ -f "/usr/bin/${BINARY_NAME}" ]; then
INSTALLED=$(/usr/bin/${BINARY_NAME} --version 2>&1 | grep -oP "version \K[0-9.]+" || echo "unknown")
if [ "$INSTALLED" = "$VERSION" ]; then
echo "Already installed. Skipping."
exit 0
fi
fi
# ... rest of installation ...
```
**Poor (non-idempotent) patterns to avoid:**
```bash
#!/bin/bash
# ✗ No checks - will fail if run twice
sudo apt-get install my-package
mkdir /opt/my-app
cp config /etc/my-app/
# Better version:
sudo apt-get install -y my-package || true # -y skips confirmation
mkdir -p /opt/my-app # -p doesn't fail if exists
[ -f /etc/my-app/config ] || cp config /etc/my-app/
```
### Error Handling
**Always use `set -e` at the start:**
```bash
#!/bin/bash
set -e # Exit on any error
# Any command failure will stop execution
wget https://example.com/file
tar -xzf file.tar.gz
mv binary /usr/bin/
```
**Provide helpful error messages:**
```bash
#!/bin/bash
set -e
echo "Starting installation..."
if ! wget -q "$URL" -O "$FILENAME"; then
echo "✗ Failed to download from $URL" >&2
exit 1
fi
echo "✓ Download complete"
```
### Real-World Example: Binary Installation Script
```bash
#!/bin/bash
# Real-world example from piqsty_pg_exporter_install_callback_v1.sh
set -e
# Extract parameters from Odoo objects
DOWNLOAD_URL="{{ params.get('prometheus_exporter_obj').source_url }}"
BINARY_NAME="{{ params.get('prometheus_exporter_obj').exporter_software_release_id.command_name }}"
VERSION="{{ params.get('prometheus_exporter_obj').exporter_software_release_id.version }}"
FILENAME="{{ params.get('prometheus_exporter_obj').exporter_software_release_id.filename }}"
echo "Installing ${BINARY_NAME} version ${VERSION}"
# Idempotency check
if [ -f "/usr/bin/${BINARY_NAME}" ]; then
INSTALLED_VERSION=$(/usr/bin/${BINARY_NAME} --version 2>&1 | grep -oP 'version \K[0-9.]+' || echo "unknown")
if [ "${INSTALLED_VERSION}" = "${VERSION}" ]; then
echo "✓ Already installed. Skipping."
exit 0
fi
fi
# Create isolated temp directory
TMP_DIR=$(mktemp -d)
trap "rm -rf ${TMP_DIR}" EXIT
cd "${TMP_DIR}"
# Download
echo "⬇ Downloading from ${DOWNLOAD_URL}..."
wget -q "${DOWNLOAD_URL}" -O "${FILENAME}"
# Extract (flat structure)
echo "📦 Extracting..."
tar -xzf "${FILENAME}"
# Install
echo "📍 Installing to /usr/bin..."
chmod +x "${BINARY_NAME}"
mv "${BINARY_NAME}" /usr/bin/
# Verify
/usr/bin/${BINARY_NAME} --version
echo "✓ Installation complete"
```
---
## Task Parameters
### Positional Parameters
**Definition**: Must be provided in order; no defaults allowed.
```xml
host_obj
p
OdooModelType
```
**Usage in script:**
```bash
HOST_NAME="{{ params.get('host_obj').name }}"
echo "Installing on: $HOST_NAME"
```
**Invocation:**
```python
task_obj.run_task(host_obj) # First positional param
# or
task_obj.invoke(host_obj) # Async version
```
### Named Parameters
**Definition**: Optional; can have defaults; provided by name.
```xml
pg_version
n
str
14
```
**Usage:**
```python
task_obj.run_task(host_obj, pg_version="13") # Override default
task_obj.run_task(host_obj) # Uses default "14"
```
### Value Types Reference
| Type | Python Equivalent | Example |
|------|-------------------|---------|
| `str` | string | `"production"` |
| `int` | integer | `8080` |
| `float` | float | `1.5` |
| `bool` | boolean | `True` / `False` |
| `dict` | dictionary | `{"key": "value"}` |
| `list` | list | `["item1", "item2"]` |
| `OdooModelType` | Odoo recordset | `env['mpy.host'].browse(5)` |
| `JSONType` | any JSON | Complex nested structures |
### Special Parameter: _imq_logger
For asynchronous tasks, you can receive a task logger:
```xml
_imq_logger
n
```
This allows logging from your Python code when invoking async:
```python
task_obj.invoke(host_obj, _imq_logger=my_logger)
```
---
## Execution Flow
### How shell_task.py Works
**Location**: `project_addons/muppy_core/scripts/shell_task.py`
The `run_script()` Fabric task performs these steps:
1. **Generate unique filename**:
```
/tmp/{uuid}_{task_name}
```
2. **Upload script**: Write template-rendered content to file
3. **Set permissions**: `chmod 744` (owner RWX, group/other RX)
4. **Set ownership**: Change owner if `shell_script_username` specified
5. **Execute script**:
```bash
# If username specified:
sudo su - {username} -c '{shell_program} {script_path}'
# Otherwise:
{shell_program} {script_path}
```
6. **Cleanup**: Delete temporary script file
7. **Return result**: Fabric Result object with exit code, stdout, stderr
### SSH Connection & Gateway Support
The Fabric library automatically:
- Creates SSH connection using host credentials
- Handles SSH key authentication
- Supports SSH gateways/proxies if configured
- Manages connection lifecycle
---
## Invoking Tasks
### Method 1: Synchronous Execution (run_task)
Blocks until task completes.
**From Python code:**
```python
def my_action(self):
task_obj = self.env['mpy.task'].search_by_code('my_module:my_task.sh')
host_obj = self.host_id
# Positional and named parameters
result = task_obj.run_task(host_obj, version="1.0", debug=True)
if result.failed:
raise ValueError(f"Task failed: {result.stderr}")
self.message_post(body=f"Output: {result.stdout}")
```
### Method 2: Asynchronous Execution (invoke)
Returns immediately; task runs in background via message queue.
**From Python code:**
```python
def my_action(self):
task_obj = self.task_id
result = task_obj.invoke(
self.host_id,
version="1.0",
_imq_message_name="my_task_run",
_imq_message_group="my_tasks",
)
self.message_post(body="Task started in background")
```
### Method 3: Search by Code String
Instead of finding the task record first:
```python
task_code = "odoo.addons.muppy_core.scripts.shell_task:piqsty_pg_exporter_install_callback_v1.sh"
task_obj = self.env['mpy.task'].search_by_code(task_code)
result = task_obj.run_task(host_obj, prometheus_exporter_obj=exporter)
```
**Code Format**: `module_name:task_name`
### Method 4: Button Action on Task Form
From the Task form view in the UI:
```xml
mpy.task
```
### Callback Pattern: Auto-Running on Software Release
Tasks can be automatically invoked during software release installation:
**Software Release Model:**
```python
callback_task_id = fields.Many2one('mpy.task', ...) # Links to task
callback_task_code = fields.Char(...) # Code string: "module:task.sh"
```
**Invocation location** (`software_release.py` line ~159):
```python
if self.callback_task_id:
callback_task_id.invoke(host_obj, prometheus_exporter_obj=exporter)
```
---
## Real-World Examples
### Example 1: PostgreSQL Client Installation
**File:** `project_addons/muppy_dev_server/data/dev_server_script_install_task_pg_client.xml`
```xml
install_postgresql_client.sh
Install PostgreSQL client
script
devserver_install
bash
postgresql_version
n
str
14
```
**Usage:**
```python
task = env['mpy.task'].search_by_code('muppy_dev_server:install_postgresql_client.sh')
task.run_task(host_obj, postgresql_version="15")
```
### Example 2: System Packages Installation
**Location:** `project_addons/muppy_dev_server/data/dev_server_script_install_task_system_prerequisites.xml`
This task installs base packages with OS version detection:
```bash
#!/bin/bash
set -e
OS_VERSION=$(lsb_release -rs)
if [ "$OS_VERSION" = "24.04" ]; then
# Ubuntu 24.04 specific packages
sudo apt-get update
sudo DEBIAN_FRONTEND=noninteractive apt-get install -y \
build-essential python3-dev git
elif [ "$OS_VERSION" = "22.04" ]; then
# Ubuntu 22.04 specific packages
sudo apt-get update
sudo DEBIAN_FRONTEND=noninteractive apt-get install -y \
build-essential python3-dev git
else
echo "Unsupported OS version: $OS_VERSION" >&2
exit 1
fi
```
### Example 3: Pigsty pg_exporter Binary Installation
**Location:** `project_addons/muppy_prometheus_exporters/data/piqsty_pg_exporter_install_callback_mpy_task.xml`
This is the fixed task we created, showing:
- Idempotent installation (version checking)
- Parameter extraction from Odoo objects
- Error handling with helpful messages
- Cleanup using shell traps
See the "Shell Script Templates" section for full example.
### Example 4: Odoo/ikb Installation
**Location:** `project_addons/muppy_dev_server/data/dev_server_script_install_tasks.xml`
Complex task with multiple named parameters:
```python
task.run_task(
dev_server_obj.host_id, # Positional
dev_server_obj, # Positional
python_version="cpython@3.12.8", # Named
odoo_version="18", # Named
dev_mode=True, # Named
)
```
---
## Testing and Debugging
### Running a Task Manually from Code
```python
# In Python interpreter or action method
task_obj = self.env['mpy.task'].search([
('name', '=', 'install_postgresql_client.sh')
])
host_obj = self.env['mpy.host'].search([], limit=1)
result = task_obj.run_task(host_obj, postgresql_version="15")
print(f"Exit code: {result.exited}")
print(f"Success: {result.ok}")
print(f"Output:\n{result.stdout}")
print(f"Errors:\n{result.stderr}")
```
### Viewing Task Logs
**Odoo Server Logs:**
```bash
# Watch server logs while task runs
tail -f /var/log/odoo/odoo-server.log | grep "mpy.task"
```
**Fabric Debug Output:**
```bash
# Run with debug logging
bin/start_odoo --log-level=debug
```
### Common Testing Issues
| Issue | Solution |
|-------|----------|
| Template variables undefined | Check parameter names match exactly |
| SSH connection fails | Verify host credentials and SSH keys |
| Script fails with "Permission denied" | Ensure script is executable (happens automatically) |
| Idempotency check doesn't work | Binary version output format may differ |
| Parameter not found in script | Use `{{ params.get('name', 'default') }}` |
### Creating a Test Task
**For prototyping:**
1. Create task via GUI with simple script:
```bash
#!/bin/bash
echo "Test message: {{ params.get('message', 'hello') }}"
hostname
date
```
2. Run from action method:
```python
task = self.task_id
result = task.run_task(self.host_id, message="my test")
print(result.stdout) # See output
```
---
## Advanced Topics
### Message Queue Integration
For asynchronous task execution with job tracking:
```python
from odoo.addons.inouk_message_queue.models.message_queue import current_logger
@api.multi
def start_background_task(self):
logger = current_logger()
# Task runs asynchronously
self.task_id.invoke(
self.host_id,
_imq_message_name="deploy_task",
_imq_message_group="deployments",
_imq_logger=logger, # Receives task logger
)
self.message_post(body="Deployment started")
```
### SSH Gateway/Proxy Support
Automatically handled by Fabric via host configuration:
```python
# Host model can specify gateway
host_obj.ssh_gateway_id # Many2one to another host
```
Fabric automatically routes connections through gateway.
### Task Synchronization
System automatically scans Python files for Fabric tasks and creates task records:
```python
# In script.py
@fabric_task()
def my_task(cnx, host_obj, param1):
"""Task docstring"""
# Implementation
pass
```
Manually trigger synchronization:
```python
self.env['mpy.script'].sync_all_fabric_tasks()
```
---
## Workflow Recommendations
### Development Workflow
**Rapid Prototyping:**
1. Create task via **GUI** with `shell_script_template`
2. **Run immediately** to test
3. Iterate on script content
4. Once working, export to XML for version control
**Converting GUI Task to XML:**
```
1. Create in GUI
2. Copy shell_script_template content
3. Create XML data file with copied content
4. Delete GUI record
5. Commit XML to Git
```
### Production Workflow
1. **Write task** as XML in module's `data/` directory
2. **Add to `__manifest__.py`** data file list:
```python
'data': [
'data/my_tasks.xml',
],
```
3. **Commit** to version control
4. **Deploy** module to production
5. **Invoke via callbacks** or from model methods
### Sharing Tasks Between Environments
**From Development to Staging/Production:**
```bash
# Export from development
git checkout staging
git merge develop # includes new task XML
# Install on staging
cd /opt/muppy/appserver-mpy13c
/usr/local/python/current/bin/ikb install
bin/start_odoo -u muppy_prometheus_exporters --stop-after-init
# Task is now available
```
---
## Best Practices
### Idempotency
**Always assume your script might run twice on same host:**
```bash
#!/bin/bash
set -e
# ✓ Check before action
if [ ! -d "/opt/myapp" ]; then
mkdir -p "/opt/myapp"
fi
# ✓ Use || true for non-critical commands
apt-get update || true
# ✓ Check existing version
if command -v myapp &> /dev/null; then
VERSION=$(myapp --version)
if [ "$VERSION" = "1.0" ]; then
exit 0 # Already at desired version
fi
fi
```
### Error Handling
```bash
#!/bin/bash
set -e # Critical: exit on error
# Helpful error messages
if ! command -v wget &> /dev/null; then
echo "ERROR: wget not found. Install with: apt-get install wget" >&2
exit 1
fi
# Provide context in messages
echo "⬇ Downloading from: $URL"
echo "📦 Installing to: $INSTALL_DIR"
echo "✓ Installation complete"
```
### Logging and Feedback
```bash
#!/bin/bash
# Use clear prefixes
echo "[INFO] Starting installation..."
echo "[WARN] Backup directory not found"
echo "[ERR] Download failed" >&2
# Show progress
echo "Step 1: Downloading..."
# step 1
echo "Step 2: Extracting..."
# step 2
echo "Step 3: Installing..."
# step 3
```
### Security Considerations
**Be careful with secrets:**
- Never hardcode passwords or tokens
- Use Odoo Vault fields when available
- Don't echo sensitive parameters
- Use `set +x` around sensitive operations
```bash
#!/bin/bash
set -e
# ✓ Safely handle credentials
API_KEY="{{ params.get('api_key') }}"
# ✓ Disable echo for password operations
set +x
curl -H "Authorization: Bearer $API_KEY" https://api.example.com/
set -x
```
### Code Conventions
**Parameter naming:**
```python
# ✓ Objects end with _obj
prometheus_exporter_obj
host_obj
server_obj
# ✓ IDs end with _id
host_id
server_id
# ✓ Collections end with _ids or _objs
host_ids
server_objs
```
**Task naming:**
```
# ✓ Descriptive action + target + version
install_postgresql_client_v1.sh
build_odoo_ikb_v2.sh
configure_traefik_proxy_v1.sh
# ✓ Include callback purpose in callback tasks
piqsty_pg_exporter_install_callback_v1.sh
traefik_config_update_callback_v1.sh
```
**Jinja2 template style:**
```bash
#!/bin/bash
# ✓ Always quote template variables
VERSION="{{ params.get('version') }}"
echo "Installing: $VERSION"
# ✓ Use params.get() with defaults
LEVEL="{{ params.get('log_level', 'info') }}"
# ✗ Avoid
{{ params['version'] }} # Crashes if undefined
{{ params.version }} # Crashes if undefined
```
---
## Appendix
### Task Category Reference
| Category | Use Case | Example |
|----------|----------|---------|
| `prometheus_exporter_install` | Install monitoring exporters | pg_exporter, node_exporter |
| `devserver_install` | Development server setup | Odoo, ikb, dependencies |
| `host_enrollment_callback` | Post-enrollment host setup | Initial security config |
| `cidr_dynamic_range_parser` | CIDR parsing utility | IP range calculations |
### Parameter Value-Type Reference
```python
# Primitive types
'str' # String: "hello", "1.0"
'int' # Integer: 42, 8080
'float' # Float: 3.14, 1.5
'bool' # Boolean: True, False
# Complex types
'dict' # Dictionary: {"key": "value"}
'list' # List: ["item1", "item2"]
# Odoo types
'OdooModelType' # Recordset: env['model'].search()
'JSONType' # Any JSON-serializable structure
# Special
'' # For _imq_logger (no type checking)
```
### Fabric Result Object Fields
The result returned from task execution includes:
```python
result.command # Command that was run
result.ok # Boolean: did it succeed?
result.failed # Boolean: did it fail?
result.exited # Integer: exit code
result.stdout # String: standard output
result.stderr # String: standard error
result.return_code # Alias for exited
```
Example usage:
```python
result = task_obj.run_task(host_obj)
if result.ok:
print("Success!")
print(result.stdout)
else:
print(f"Failed with code {result.exited}")
print(result.stderr)
```
### Troubleshooting Guide
#### Script not found / Template variables undefined
**Symptoms:**
```
KeyError: 'undefined_param'
```
**Solution:**
1. Check parameter names match exactly
2. Verify parameter is defined in `mpy.task_parameter`
3. Use `params.get('name', 'default')` instead of `params['name']`
#### SSH permission denied
**Symptoms:**
```
Authentication failed
```
**Solution:**
1. Verify host SSH keys are configured
2. Check control user has SSH access
3. Verify firewall allows SSH
#### Script runs but produces wrong output
**Symptoms:**
```
$VARIABLE shows as "$VARIABLE" instead of value
```
**Solution:**
Use double quotes, not single quotes:
```bash
# ✗ Wrong
MESSAGE='{{ params.get("msg") }}' # Single quotes prevent Jinja2 eval
# ✓ Correct
MESSAGE="{{ params.get('msg') }}" # Double quotes allow Jinja2 eval
```
#### Task marked as failed but script succeeded
**Symptoms:**
```
result.failed = True
result.stdout = "Success"
result.exited = 0
```
**Solution:**
This can happen due to connection timeout or host disconnection. Check:
1. Host is reachable via SSH
2. Script completes in reasonable time
3. Network connectivity during execution
---
## Quick Reference
### Create Task in GUI
1. Go to **Infrastructure → Tasks → Tasks**
2. Click **Create**
3. Fill name, description, task_type='script', script_id=shell_task_script
4. Write template in **Shell Script Template**
5. Add parameters in **Parameters** section
6. Save
### Create Task in XML
```xml
my_task.sh
script
devserver_install
```
### Invoke Task from Code
```python
# Synchronous
result = task_obj.run_task(host_obj, param1="value1")
# Asynchronous
task_obj.invoke(host_obj, param1="value1")
```
### Access Parameters in Script
```bash
#!/bin/bash
PARAM="{{ params.get('param_name') }}"
FIELD="{{ params.get('obj_param').field_name }}"
```
---
## Additional Resources
- **Task Model**: `project_addons/muppy_core/models/task.py`
- **Shell Task Executor**: `project_addons/muppy_core/scripts/shell_task.py`
- **API Execution**: `project_addons/muppy_core/api/__init__.py`
- **Real Examples**: See all `dev_server_script_*.xml` and `piqsty_pg_exporter_install_callback_mpy_task.xml` files
================================================================================
# Restic Backup & Restore
Source: user_guides/restic-backup-restore.md
================================================================================
---
description: Muppy manages restic incremental, encrypted, deduplicated backups on S3.
---
# Restic Backup & Restore
## Overview
[Restic](https://restic.net/) is an incremental, encrypted, deduplicated snapshot
tool that stores repositories on S3-compatible backends. Muppy orchestrates restic
through fabric tasks executed asynchronously on hosts via the IMQ message queue.
A restic repository is addressed as `/`. Its durable coordinates
(S3 bucket + password vault) survive host deletion, so backups remain restorable
even after the origin host is decommissioned.
!!! info "Minimum restic version"
Muppy requires restic **0.17.0+**. The `ensure_restic` task installs or upgrades
restic on the target host when it is missing or below this version.
!!! info "restic runs as root"
Muppy executes every restic command under `sudo` (root) on the host, so it can
read and restore **any** path — Odoo filestores owned by the app user,
root-owned system files, etc. The host's control user must have passwordless
sudo (the Muppy default).
## Muppy objects
| Object | Role |
|---|---|
| **Restic Repository** (`mpy.restic_repo`) | Durable coordinates (bucket + vault + prefix), retention grid, state, raw-data stats. Survives host deletion. |
| **Restic Snapshot** (`mpy.restic_snapshot`) | Synced from restic. Stores the full 64-char snapshot id, a computed 8-char short id, backup path, tags, and size. |
| **Vault** (`mpy.vault`, credential type `envfile`) | Holds a `RESTIC_PASSWORD=…` line. Operator-created; the password is never auto-generated. Losing it makes the repo unrecoverable. |
| **S3 Bucket** (`mpy.aws_s3_bucket`) | S3 endpoint + credentials. Supports AWS, Cloudflare R2, OVH, and other S3-compatible backends. |
| **Host link** (`mpy.host.restic_repo_id`) | 1:1 link from a host to a repo. The first backup auto-initializes the repo. |
### Repository states
| State | Meaning |
|---|---|
| `configured` | Coordinates set; not yet initialized on a host. |
| `initialized` | `restic init` has run; snapshots may exist. |
| `detached` | Origin host deleted; the repo survives for restore/forget. |
## Configure
1. Create or reuse an **S3 Bucket** (*Muppy → Storages → S3 Objects*).
2. Create an **Environment File vault** for the restic password
(*Muppy → Configuration → Credentials Vault → New*). Set **Credential Type**
to `Environment File` (`envfile`) — the repo's vault field filters on this
type — then in the **File entry** tab, **Env File** field, add exactly one
line:
```
RESTIC_PASSWORD=
```
The key **must** be `RESTIC_PASSWORD` (Muppy looks it up by that name). Write
the raw secret **without quotes** — Muppy shell-quotes it automatically, so any
character is safe. The password is never auto-generated.
3. Create a **Restic Repository**: select the bucket, the vault, and a prefix.
4. Open the target host and set its **Restic Repository** field (`restic_repo_id`).
5. The first backup automatically runs `restic init` and freezes the prefix
(`/`). The origin host name is also frozen at this point.
## Backup
Launch from a host form or the backup wizard:
- **Folder** — absolute path on the host to back up (required).
- **Tags** — comma- or space-separated labels (e.g. `nightly,filestore`), split
into one `--tag` flag each. A tag cannot contain a space (spaces separate tags).
The backup is incremental. After it completes, Muppy applies the repo retention
grid with `restic forget` (no `--prune`) to drop expired snapshots, then records
the new snapshot.
```
restic backup --tag ... --host --json
```
## Schedule nightly backups
Automate a backup with a **Task Run** (`mpy.task_run`) driven by a cron.
1. **Create the Task Run** — *Tasks → Task Runs → New*:
- **Task** = `restic_backup`
- **Host** = the host to back up
- Click **Refresh Parameters**, then fill:
- `folder` — absolute path to back up (e.g. `/home/muppy/.local/share/Odoo`)
- `tags` — optional (e.g. `nightly`)
- The connection and host object are injected automatically from **Host**.
- Test it once with **Launch as Job**, and confirm a snapshot appears.
2. **Create the cron** — click **Create Cron** on the Task Run. It adds a
Scheduled Action that calls `cron_launcher()`, pre-set to run daily at **02:00**.
3. **Tune it for nightly** — open the created cron and:
- **Tick all seven weekdays** (Monday→Sunday): the launcher only runs on the
days checked on the cron.
- Set **Active = True** (the cron is created disabled).
- Adjust the time/name if needed.
!!! warning "Two defaults to change"
The cron is created **inactive** and scheduled **Monday only**. For a nightly
backup you must **activate** it and **check all seven days**. The daily interval
and the 02:00 time are already correct.
Each night the cron dispatches `restic_backup` **asynchronously** on the host. The
UI returns immediately while the backup runs in the background; follow it in
**Tasks / Qs** (the IMQ journal) or the repository's **Snapshots** tab.
## Restore
Launch from a snapshot's **Restore** button (opens a wizard):
- **Target Host** — any host that can read the repo's bucket.
- **Target Path** — defaults to `/var/tmp/restore_` (safe staging).
Set `/` for an in-place restore.
- **Include Path** — auto-filled from the snapshot's `backup_path`; scopes both
the restore and `--delete` to that subtree.
- **Exact replica (--delete)** — when checked, removes files not in the snapshot.
Restic 0.17+ refuses `--delete` without an `--include` filter, so the include
path is **required**.
```
restic restore --target [--include ] [--delete]
```
!!! warning "In-place restore is destructive"
To restore an Odoo filestore in place: **STOP ODOO FIRST**, set
`target_path='/'`, check `--delete`, and keep the include path (defaults to
the snapshot backup path) so restic scopes the deletion to that subtree. The
restore task does not orchestrate systemd.
## Sync
Reconciles Muppy snapshot records with the actual restic repository
(`restic snapshots --json`):
- **Creates** records for snapshots restic knows but Muppy doesn't.
- **Updates** known records (normalizes legacy short ids to full 64-char ids).
- **Drops** Muppy records whose snapshot restic no longer knows (out-of-band
forget) — **without** raw-deleting S3 objects (restic manages its own packs).
Use Sync after an out-of-band `restic forget`, or to import snapshots created
outside Muppy.
## Prune
Applies the repo retention grid and repacks unused data:
```
restic forget --group-by host,paths --keep-last N --keep-daily N ... --prune --json
```
- Takes an **exclusive lock** — no backups can run during prune.
- Refreshes `raw_data_size_bytes` and `last_prune_ts` via `restic stats`.
!!! note "`keep_last=0` = forget all"
Setting `keep_last=0` (with the other `keep_*` at 0) tells Muppy to forget
**all** snapshots. Restic refuses `--keep-last 0` as an empty policy, so
Muppy uses `--unsafe-allow-remove-all --host ` (restic
0.17+) instead. Use this to empty a repo before destroy.
## Repo lifecycle (host deletion → destroy)
When the origin host is deleted, the repo enters the **detached** state: it
survives with its snapshots intact, and `origin_host_name` is preserved (frozen
at init) so `forget --group-by host,paths` stays coherent.
1. **Detach** — delete the origin host. The repo flips to `state=detached`.
2. **Set Execution Host** — on the detached repo form, pick any host with bucket
access. This persists across refreshes.
3. **Unlock** — run `restic unlock --remove-all` (detached ⇒ all locks are
guaranteed orphans since the origin host is gone).
4. **Forget all** — set `keep_last=0` → **Prune** → forgets every snapshot for
the origin host.
5. **Sync** — drops the now-orphaned Muppy snapshot records.
6. **Destroy (scan)** — runs `restic snapshots --json` and blocks if any
snapshots remain. When the repo is empty, it reports `destroy_ok: True`.
7. **Delete the repo record** — S3 cleanup of the (now empty) prefix is a
separate manual step (`aws s3 rm --recursive`).
## Button reference
| Button | Restic command | When to use |
|---|---|---|
| **Prune** | `forget --keep-* ... --prune` | Periodic retention enforcement + repack (exclusive lock). |
| **Sync** | `snapshots --json` → reconcile | After out-of-band forget, or to pick up external backups. |
| **Unlock** | `unlock [--remove-all]` | After a crashed backup left stale locks. |
| **Destroy (scan)** | `snapshots --json` (scan only) | Pre-deletion safety check; blocks if snapshots remain. |
================================================================================
# Introduction
Source: guides/postgresql/index.md
================================================================================
# 🐘 PostgreSQL
Muppy's PostgreSQL features are split across four Apps:
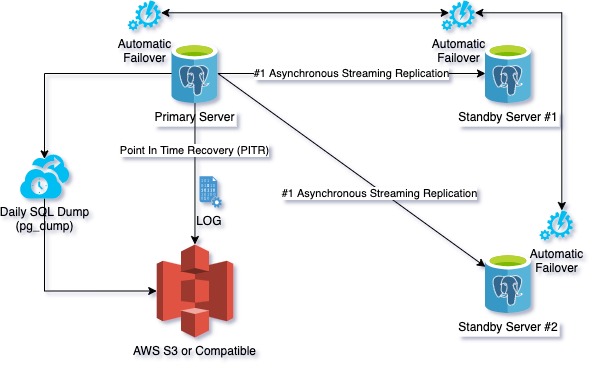
* **PostgreSQL Base** — install, configure and manage standalone PostgreSQL clusters. Back up,
restore and copy databases as `pg_dump` archives.
* **PostgreSQL Replication** — manage streaming replication over groups of clusters called
**RCS** (Replicated Cluster Set). [==Video tutorial available==](https://youtu.be/snwEz_e8yNU?si=oNe02rrWl7Q9Vt6g)
* **PostgreSQL HA** — add automatic failover to clusters running streaming replication. Built
on **pglookout**, not Patroni or repmgr.
* **PostgreSQL PITR** — **Point In Time Recovery**: continuous backup, and restore of a cluster
to any moment in time.
The diagram below shows how they fit together:
## Recovery Time Objective (RTO)
**RTO** is the longest acceptable outage — how long a PostgreSQL cluster may stay unavailable.
**Muppy PostgreSQL HA** (with **Replication**) builds RCS that meet a demanding RTO.
!!! success
Muppy can run HA across multi-cloud RCS, which gives you the highest availability levels.
## Recovery Point Objective (RPO)
**RPO** is the longest acceptable window of data loss.
**Muppy PITR** builds clusters that meet an RPO of a few minutes.
## Summary
!!! info
Deploy **Muppy PostgreSQL High Availability** and **Muppy PITR** together for clusters that
meet a demanding **RPO** *and* **RTO**.
================================================================================
# Overview
Source: guides/postgresql/base/index.md
================================================================================
# PostgreSQL Base
The Muppy PostgreSQL Base App covers:
* Installing PostgreSQL
* Managing PostgreSQL database clusters
* Backing up, restoring and copying databases (via `pg_dump`)
* Scheduled backups
* Backup retention
================================================================================
# Installation
Source: guides/postgresql/base/installation.md
================================================================================
# Installing PostgreSQL
PostgreSQL is installed on a Host from the **PostgreSQL** tab of the Host form.
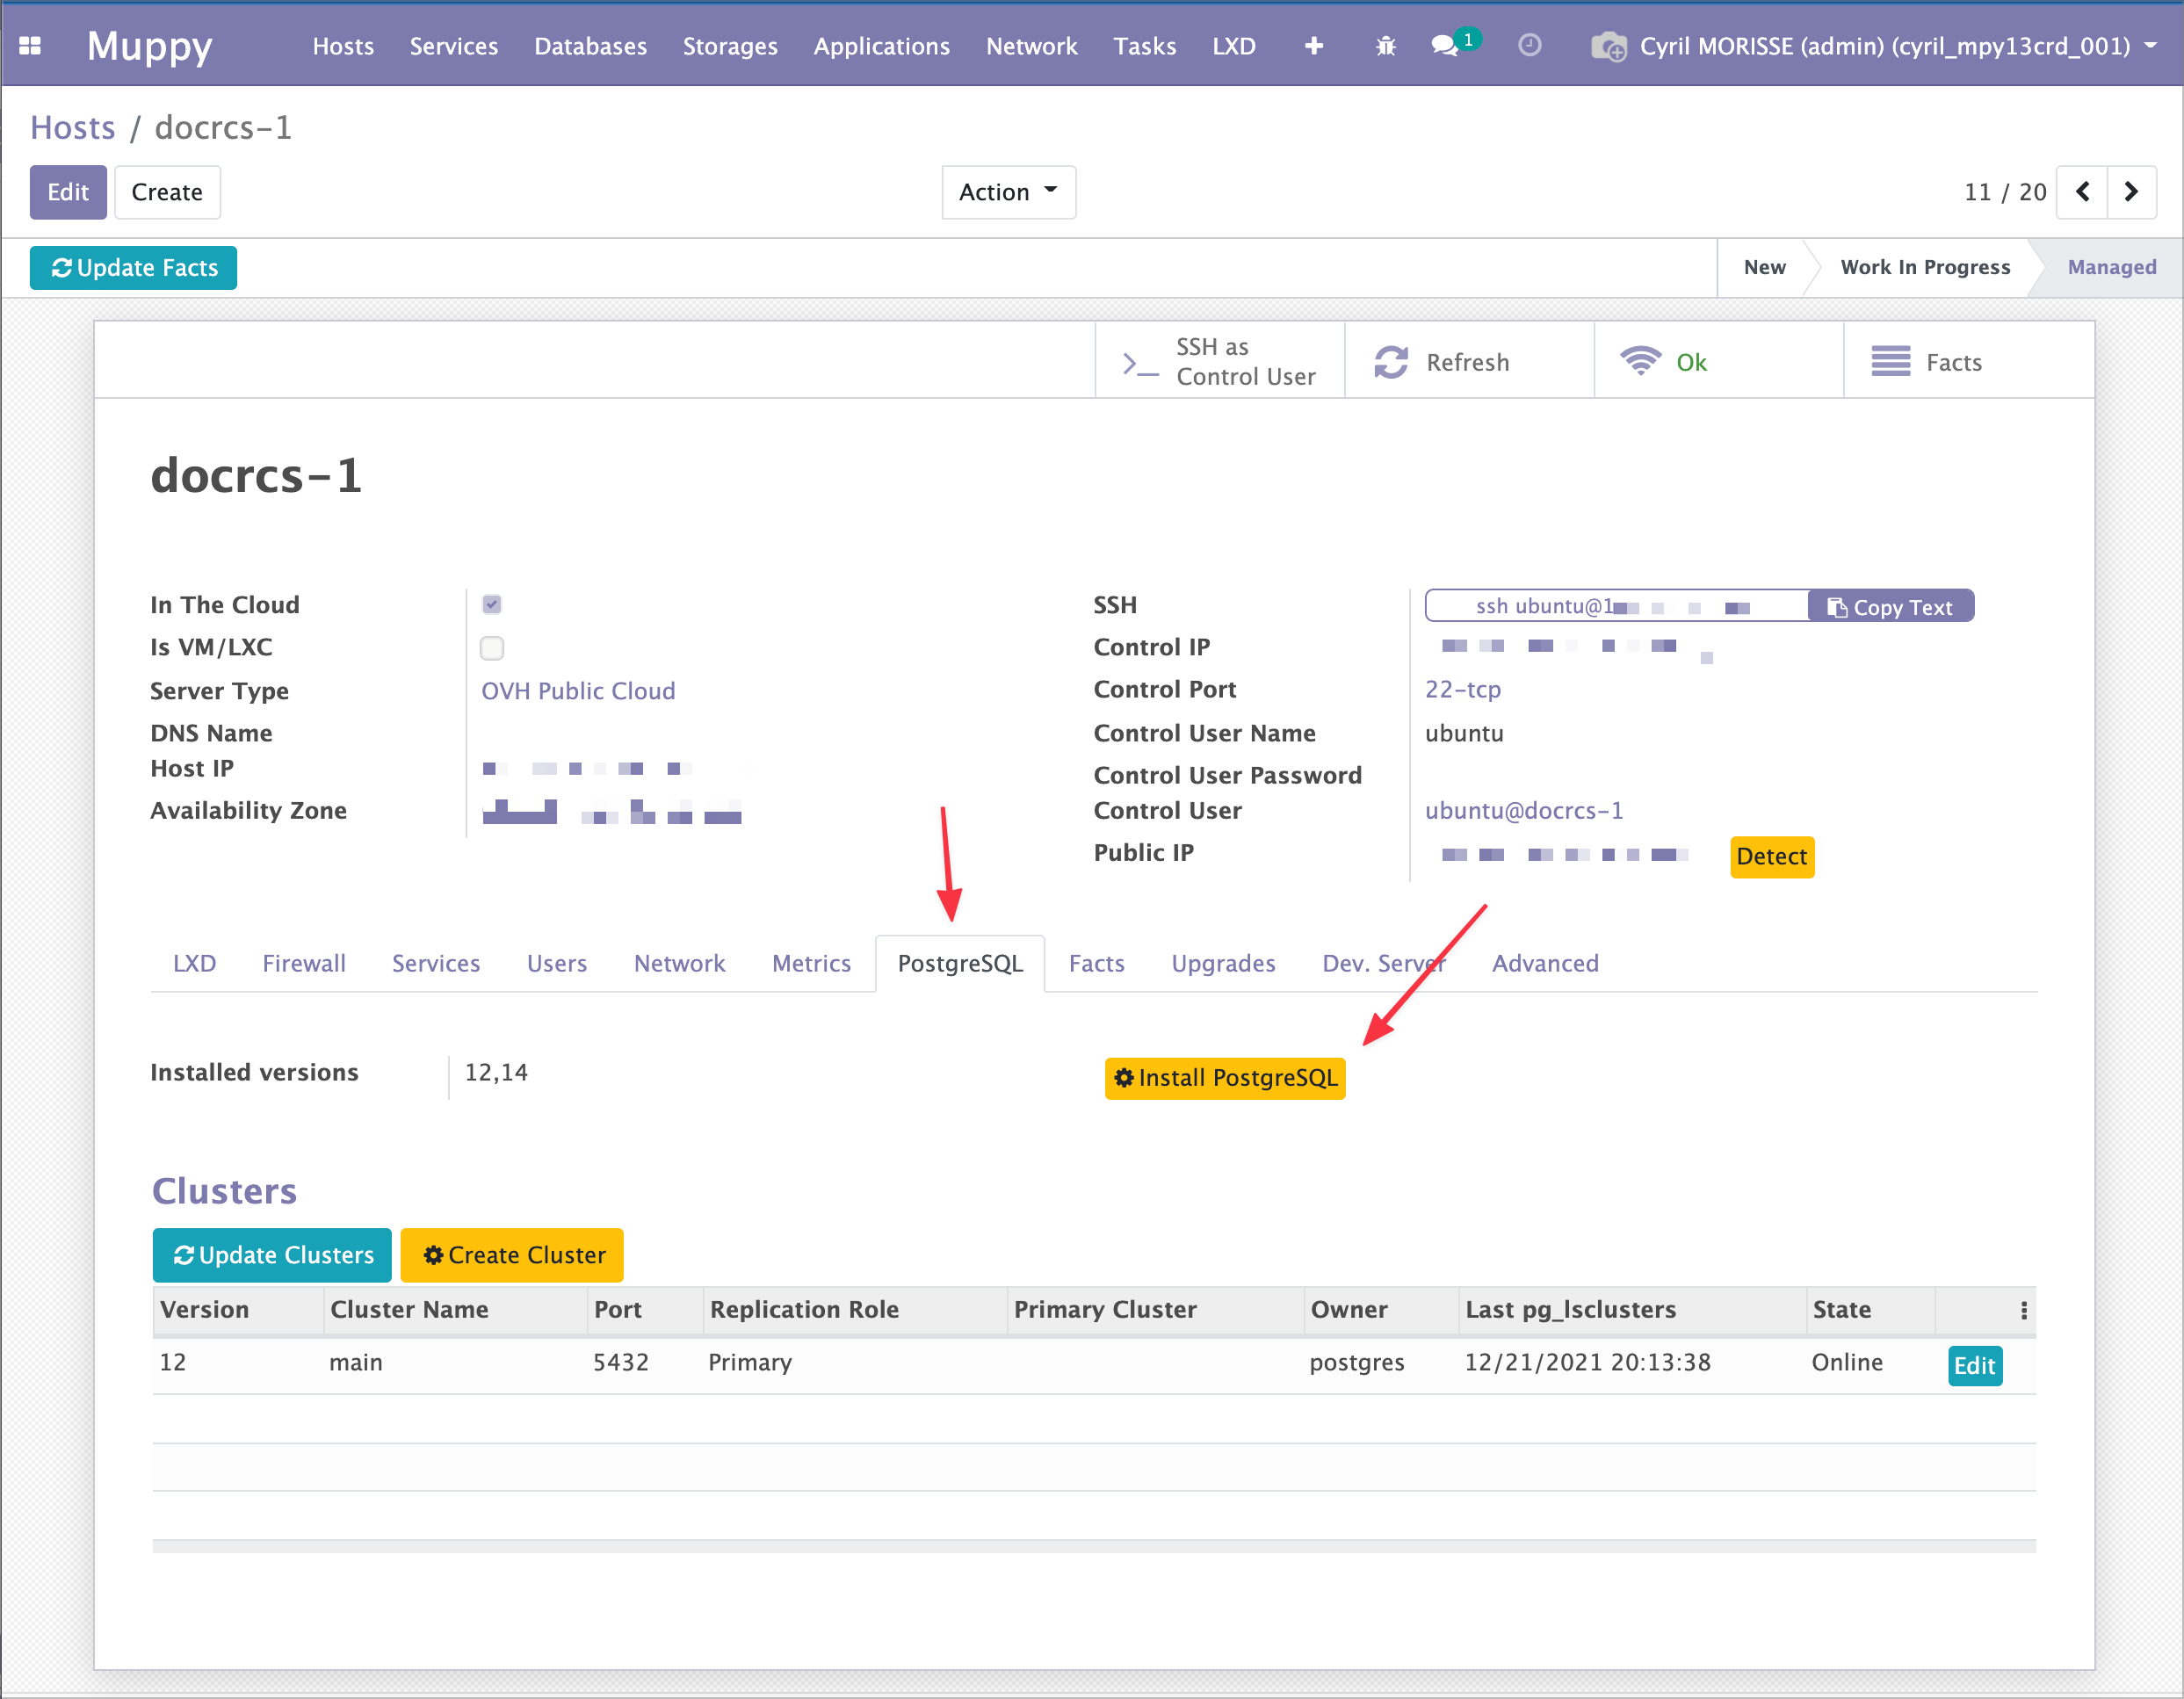
You can install PostgreSQL manually, or let Muppy install it automatically when you create a
cluster. This page covers the manual route.
1. Open the Host form.
2. On the **PostgreSQL** tab, click **Install PostgreSQL**. The **PostgreSQL Installation
Wizard** opens.
3. Pick a version and click **Launch**.
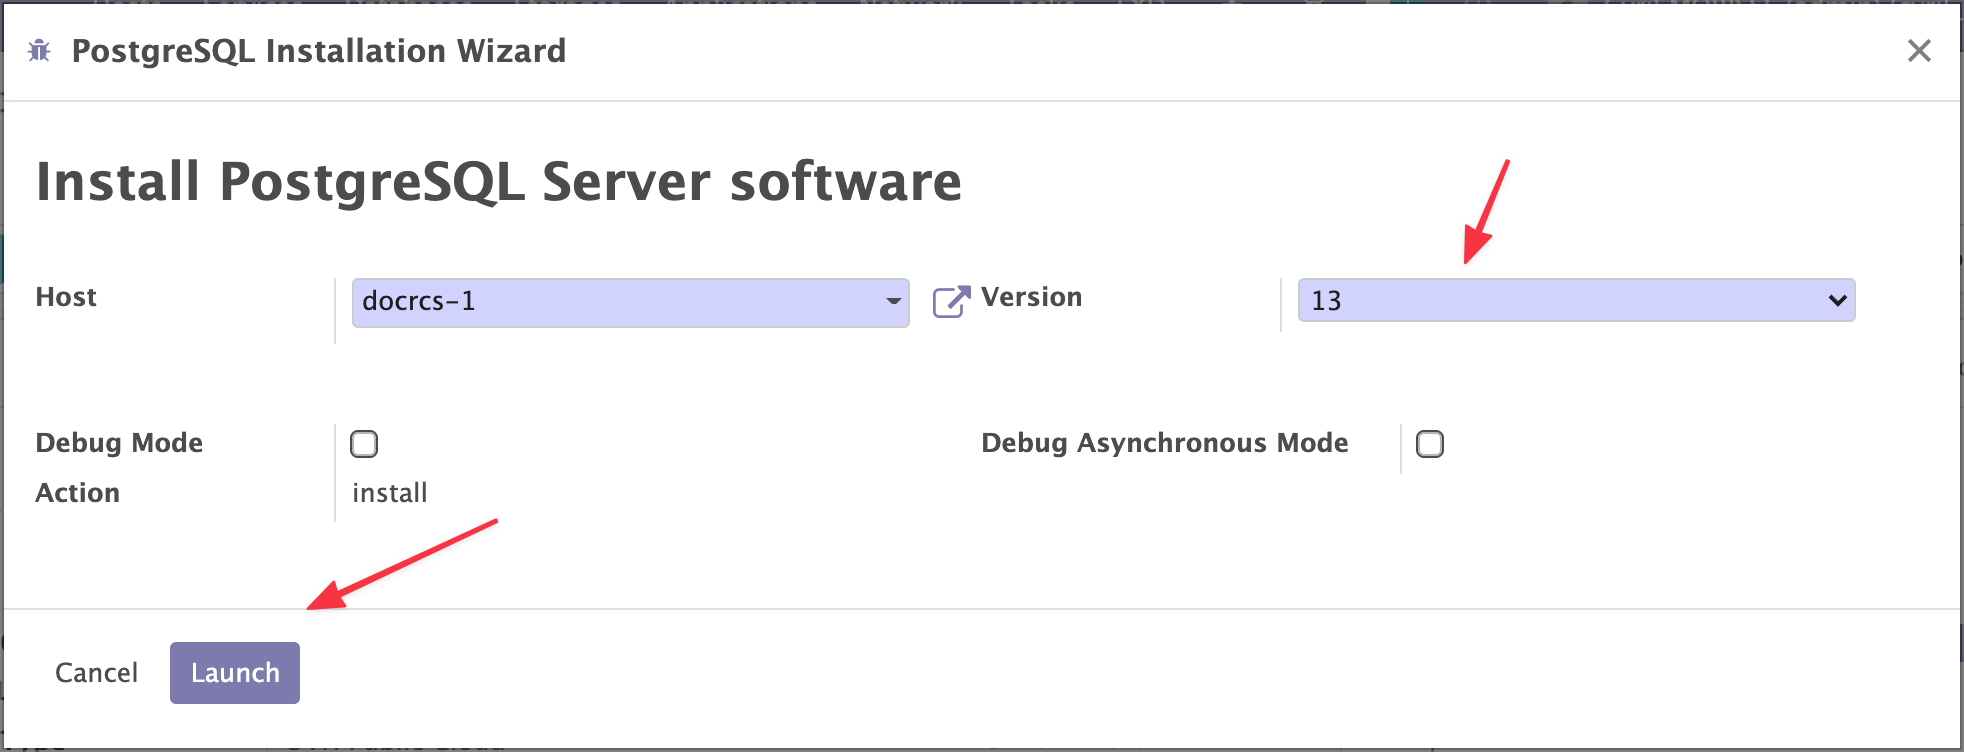
When it finishes, click **Refresh** on the Host. Muppy lists the installed PostgreSQL versions.
## Versions
Muppy installs PostgreSQL 9.5 through 18. The wizard defaults to the version set in
*Settings / PostgreSQL / PostgreSQL version*, stored in the system parameter
`muppy_postgresql_base.default_postgresql_version`. It ships as **18**.
The **pgvector** extension is installed alongside PostgreSQL 15 and later.
!!! info
Installing PostgreSQL always installs the **latest** PostgreSQL client as well. Install an
older server version and you still get the current client.
!!! danger
Installation does **not** create a cluster. Creating one is the next step.
!!! success
You can also skip this page and create a cluster straight away — Muppy installs whichever
PostgreSQL version that cluster needs.
================================================================================
# Overview
Source: guides/postgresql/base/cluster-management/index.md
================================================================================
# Cluster Management
Muppy manages PostgreSQL clusters end to end:
* Creating clusters
* Configuring clusters
* Controlling clusters (start, stop, restart, drop, upgrade)
* Basic administration (databases and roles)
================================================================================
# Creating Clusters
Source: guides/postgresql/base/cluster-management/creation.md
================================================================================
# Creating Clusters
Clusters are created from the **PostgreSQL** tab of the Host form (*Muppy / Hosts / Hosts*).
1. Click **Create Cluster**. The cluster creation wizard opens.
2. Set the **Version**, **Name**, network **Port** and
[**Locale**](https://www.postgresql.org/docs/13/locale.html).
3. Click **Launch**.
When it finishes, click **Refresh** on the Host. The new cluster appears in the list at the
bottom of the PostgreSQL tab.

The **Version** defaults to the value set in *Settings / PostgreSQL / PostgreSQL version*
(system parameter `muppy_postgresql_base.default_postgresql_version`, shipped as **18**). Muppy
installs that PostgreSQL version on the Host if it is missing.
!!! warning "New clusters are not started"
A new cluster is left in state **Down**, so you can configure it before it accepts
connections.
## Where to find clusters
* On the Host form, **PostgreSQL** tab.
* Under *Muppy / Databases / PostgreSQL / Database Clusters*, which lists every cluster Muppy
manages. This is the more convenient entry point.
================================================================================
# Configuration
Source: guides/postgresql/base/cluster-management/configuration.md
================================================================================
# Configuration
A cluster is configured entirely from its **Database Cluster** form.
* The header carries the cluster's identity.
* The **Configuration** tab holds the on-disk locations of the cluster's components.
* Each configuration file (`postgresql.conf`, `pg_hba.conf`, …) has its own tab.
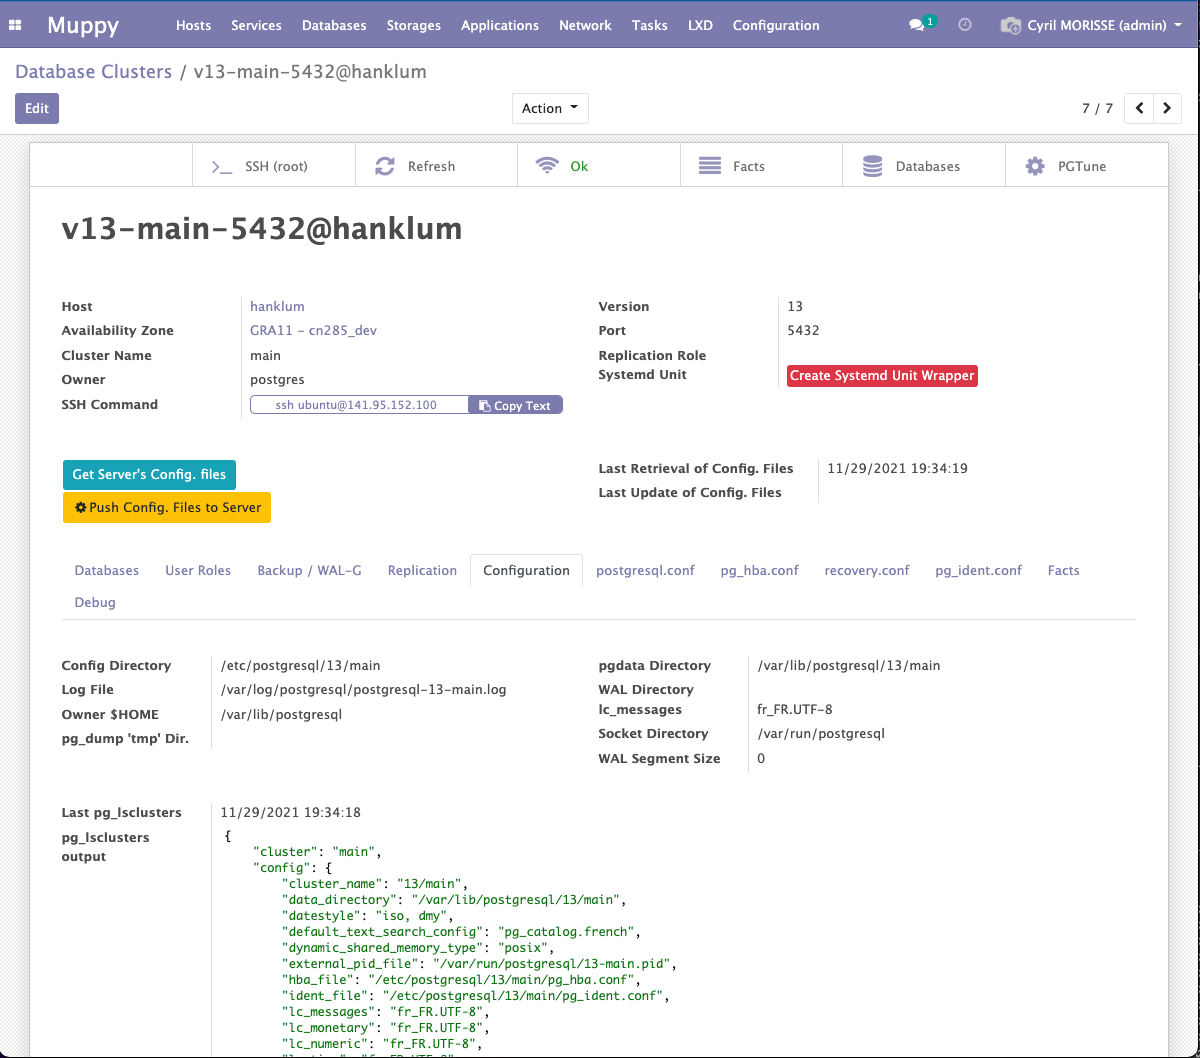
## How Muppy configures PostgreSQL
You edit the configuration files in Muppy, then push them to the cluster. You can also pull
back what the cluster currently holds. Two header buttons do this:
* **Get Server's Config. files** — read the files from the server into Muppy.
* **Push Config. Files to Server** — write Muppy's version onto the server.
Next to each button, Muppy shows when the files were last fetched and last pushed.

### postgresql.conf
The **postgresql.conf** tab manages PostgreSQL's main configuration file.
Type the directives you want to add in the first text area, labelled **postgresql.conf**. The
text areas below it show `postgresql.conf` and `postgresql.auto.conf` as they currently exist on
the server — they are read-only.
When you are done, click **Push Config. Files to Server** and confirm.
!!! info
One push covers every configuration file. Edit them all first, then push once.
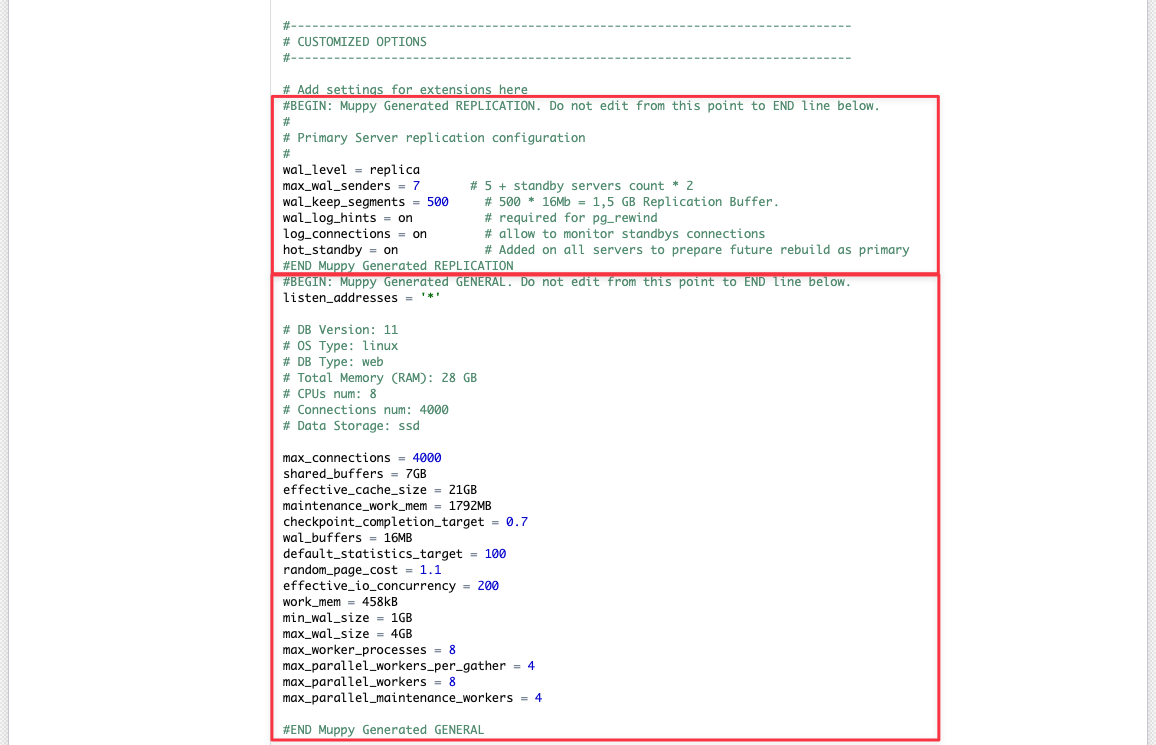
Muppy regenerates the directives as named **blocks** and rewrites the files with the current
configuration:
### pg_hba.conf
Muppy provides guided editing for `pg_hba.conf`.
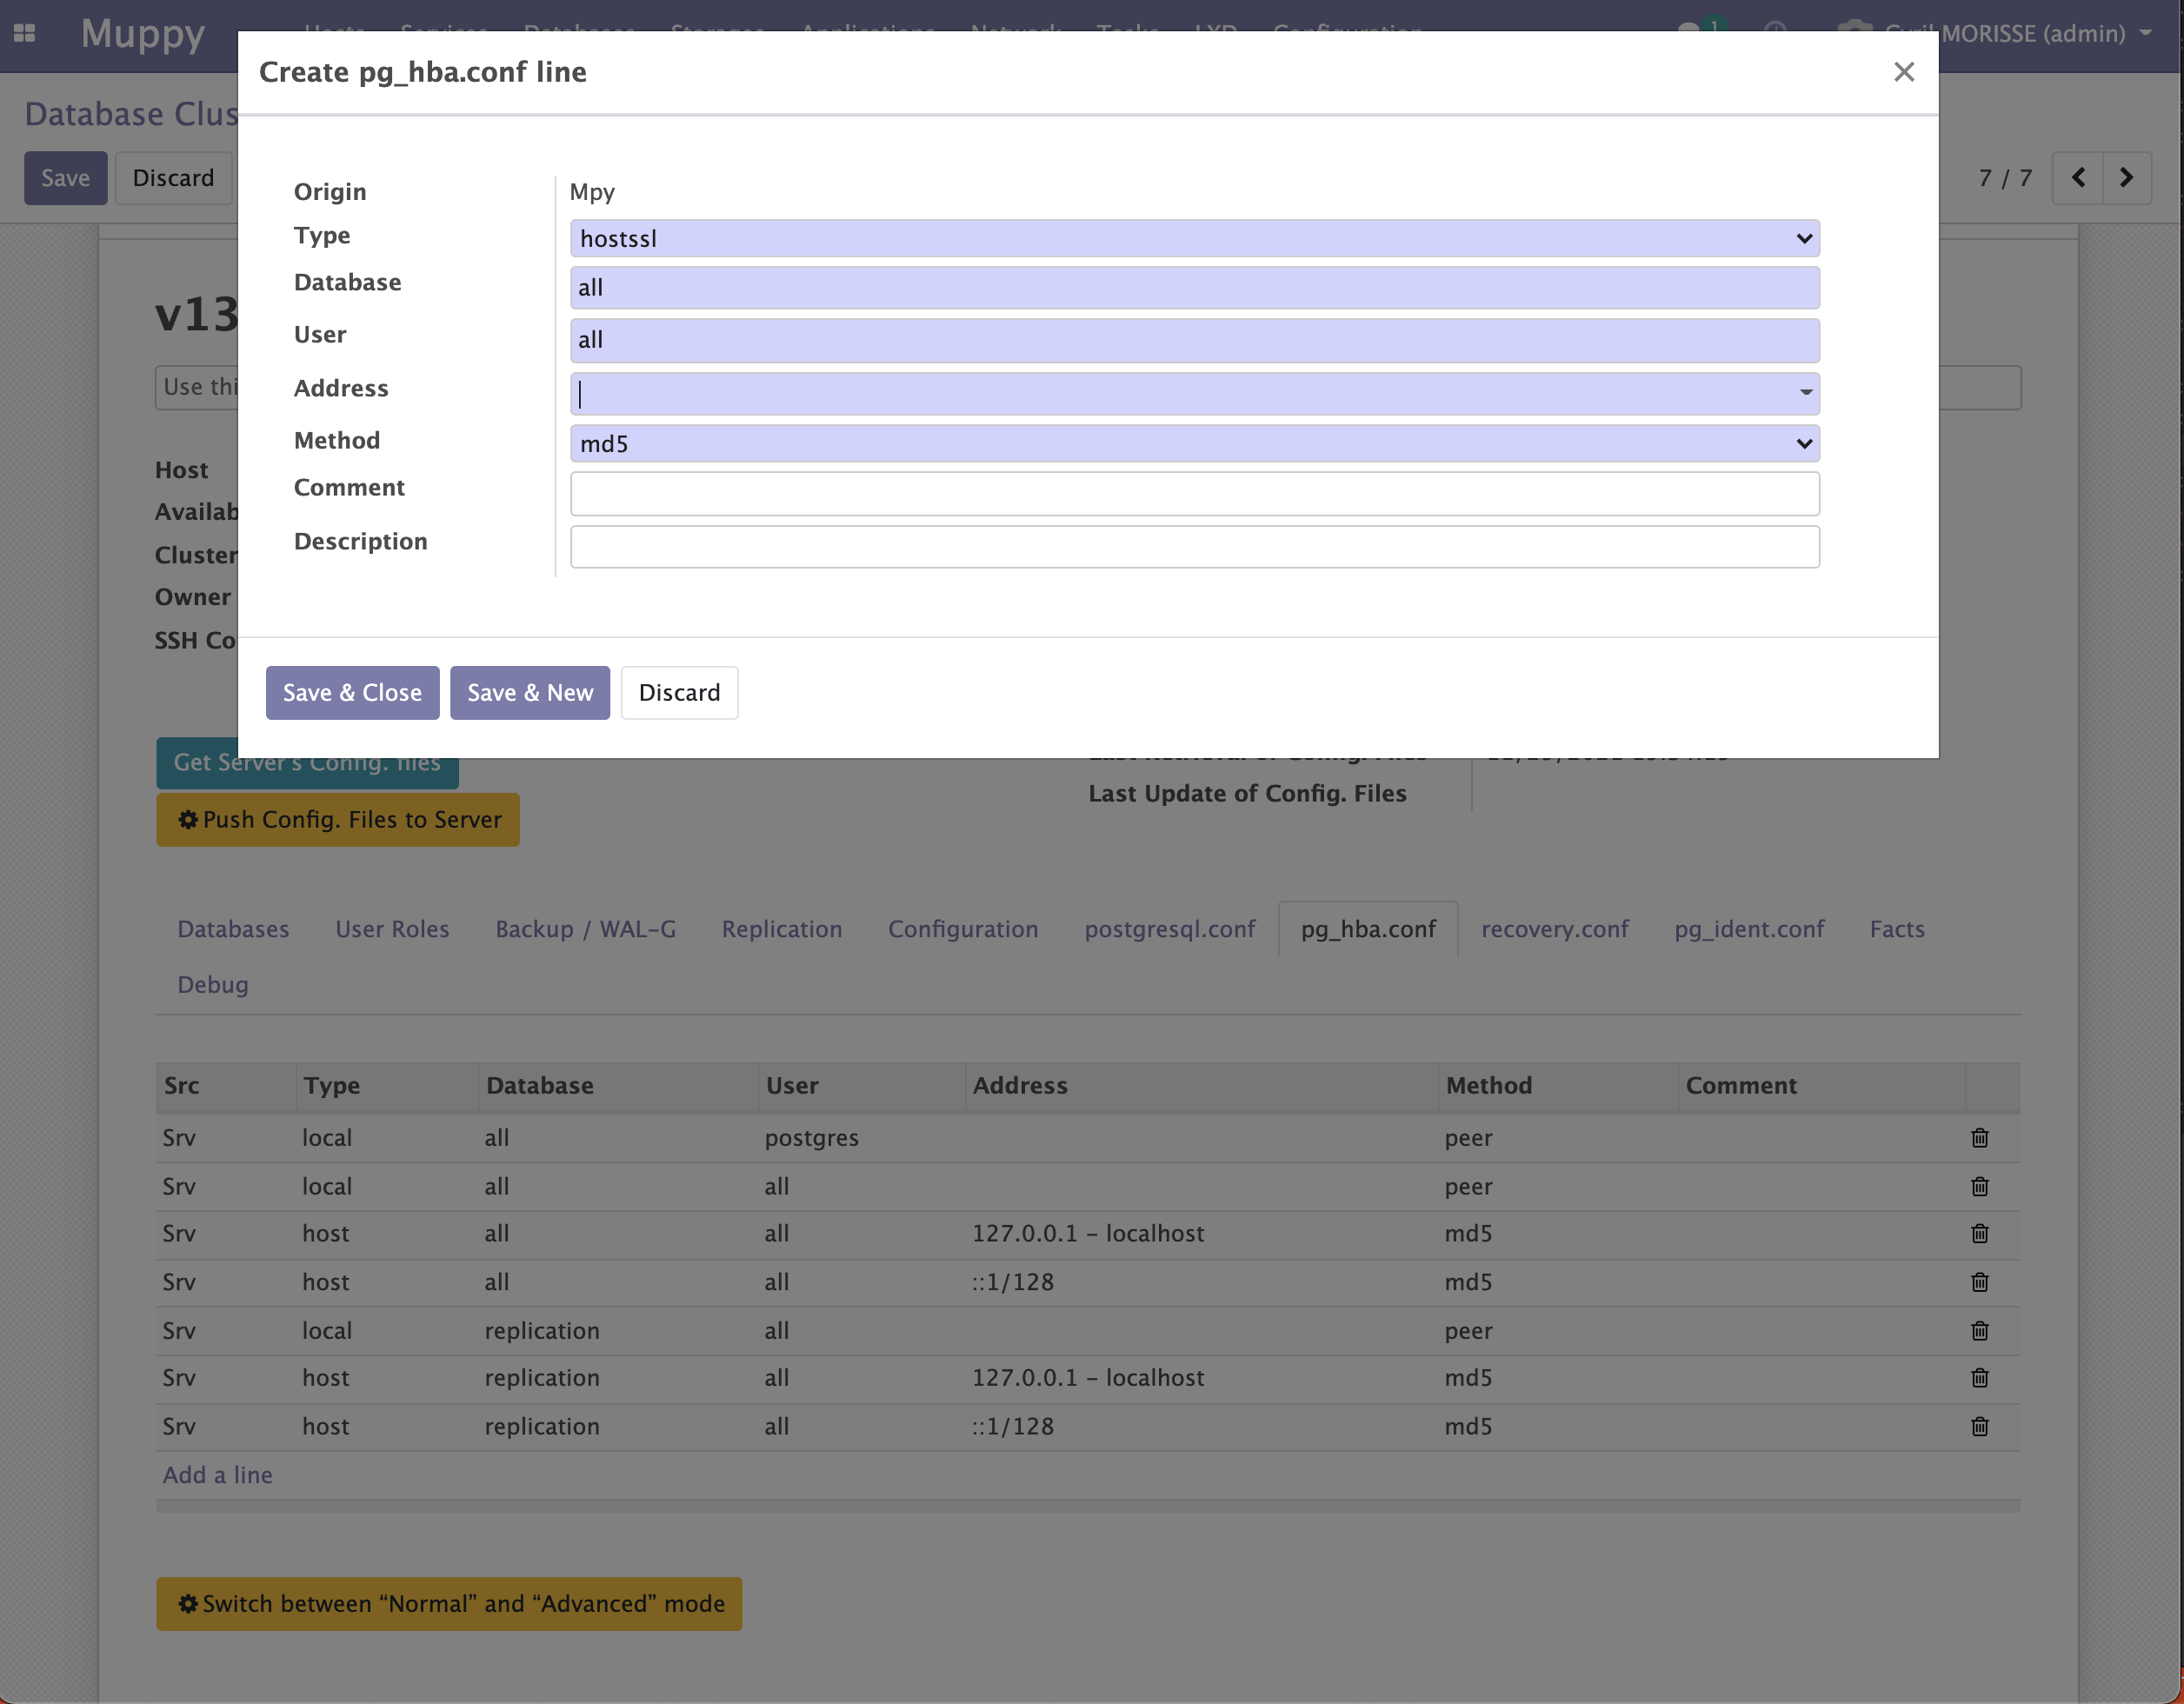
Three buttons on this tab help with common cases:
* **Switch between "Normal" and "Advanced" mode** — advanced mode exposes the raw rule fields.
* **Allow local LXCs Access** — let LXC containers on this Host reach the cluster.
* **Allow local Pods Access** — let Pods on this Host (single-node) reach the cluster.
To seed Muppy from what the server already has, use **Import pg_hba.conf** or **Import Initial
pg_hba.conf**. Both update existing lines and create the missing ones.
### recovery.conf
`recovery.conf` is generated by the PostgreSQL Replication App, for PostgreSQL 11 clusters.
### pg_ident.conf
Edited exactly like `postgresql.conf`.
================================================================================
# Control & Status
Source: guides/postgresql/base/cluster-management/control.md
================================================================================
# Control & Status
The header of the **Database Cluster** form carries the `pg_ctlcluster` commands. Which ones
appear depends on the cluster's current state.
| Button | State it appears in | What it does |
|---|---|---|
| **Start** | Down | Start the cluster. |
| **Stop** | Online | Stop the cluster. |
| **Restart** | Online | Stop then start. |
| **Reload** | Online | Reload the configuration without dropping connections. |
| **Drop Cluster** | Online or Down | `pg_dropcluster` — **erases all data**. |
| **Upgrade Cluster** | Online or Down | Upgrade the cluster to a newer PostgreSQL version. |
| **Delete** | Broken | Archive the Muppy record after PostgreSQL was removed outside Muppy. |
Each one asks for confirmation.
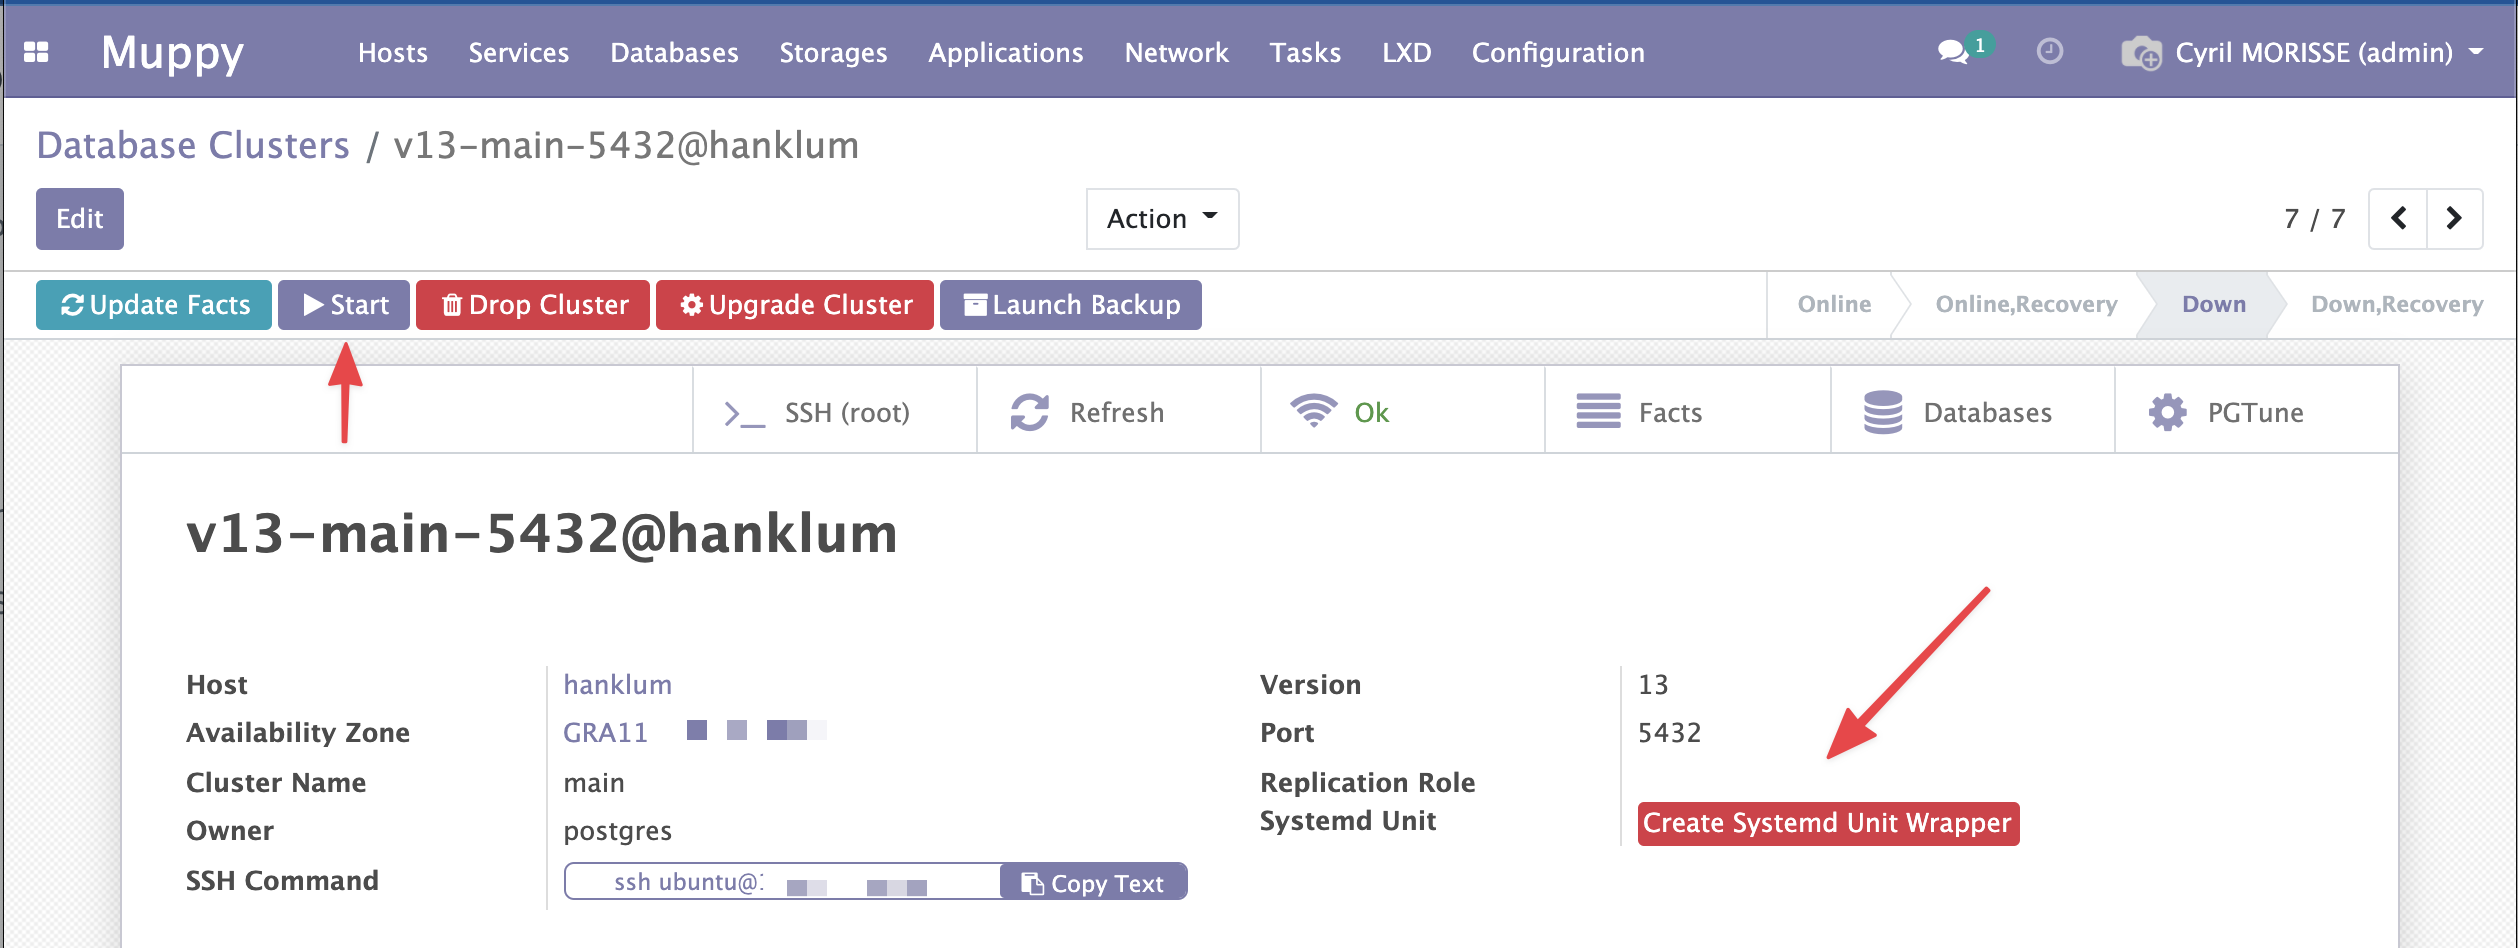
**Update Facts** refreshes the state of this cluster — and of every cluster on the same Host —
by collecting its Facts.
## Systemd unit
A cluster's systemd unit becomes available once you create a wrapper for it: on the
**Configuration** tab, click **Create Systemd Unit Wrapper**.
================================================================================
# Administration
Source: guides/postgresql/base/cluster-management/administration.md
================================================================================
# Administration (basic)
Muppy covers two administration areas:
* databases
* users and roles
!!! info
Muppy is not a full database administration tool. These functions exist to make the most
common operations easy, not to replace psql or pgAdmin.
## Databases
From a cluster you can:
* list and refresh its databases
* create or duplicate a database
* drop a database
* grant or revoke the right to connect
### Listing databases
The **Databases** tab of a cluster lists them and refreshes the list with **Update Databases
List**.
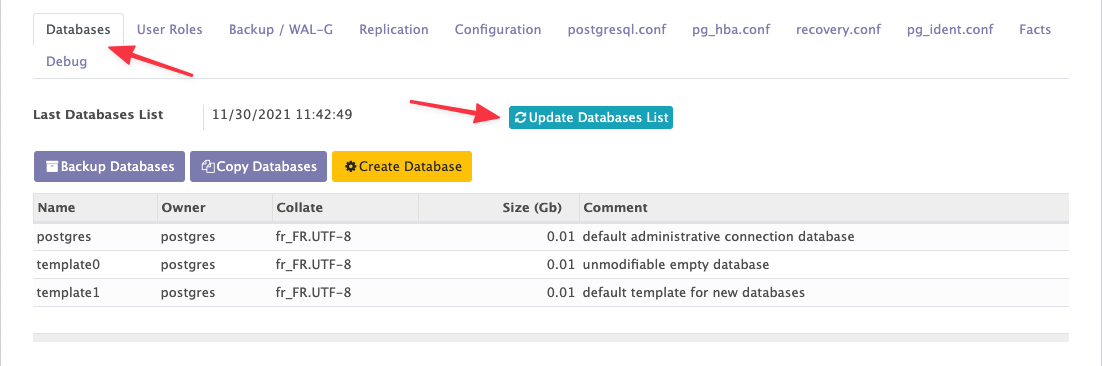
For a long list, the **Databases** stat button in the cluster header opens the same databases in
a full list view, where you can search and group them.
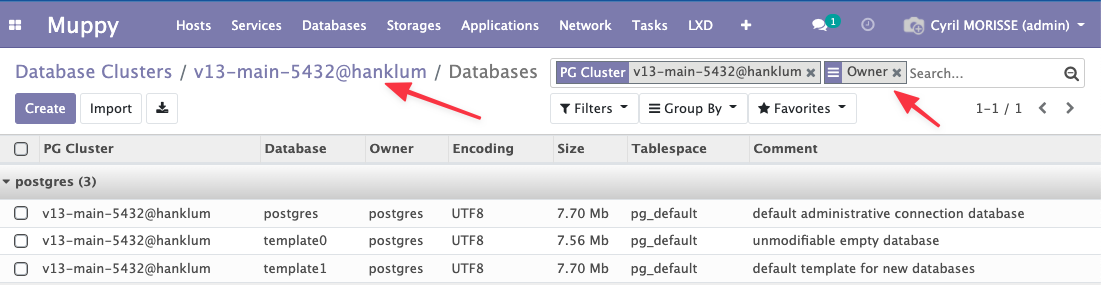
Click the cluster's name in the breadcrumb to go back to its form.
### Creating and duplicating a database
**Create Database**, on the cluster's **Databases** tab, opens a wizard that builds and runs a
`CREATE DATABASE …` statement.
!!! warning
The **Template Database** parameter duplicates an existing template database instead of
starting from scratch.
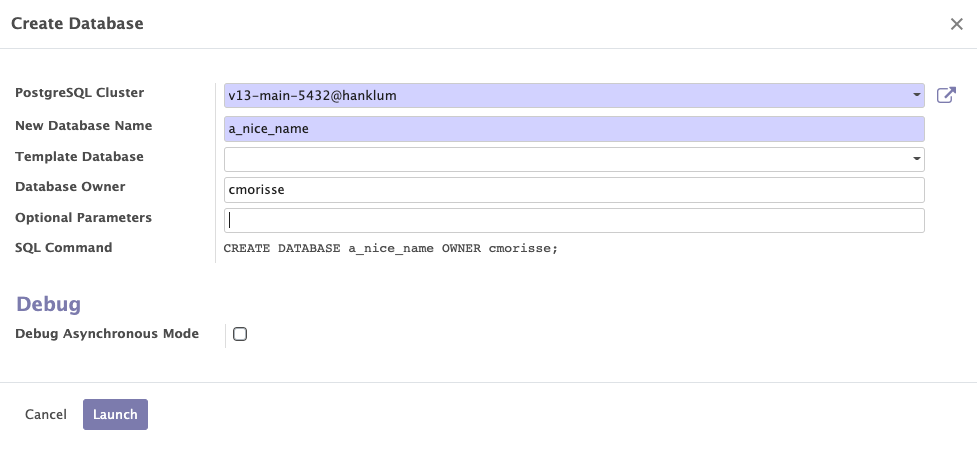
A database form also has a **Duplicate** button, which is the same operation from the other
direction: it runs `CREATE DATABASE … TEMPLATE `.
### Dropping a database
**Drop Database** sits on the database form, reachable from:
* the cluster's **Databases** tab
* the global list, *Muppy / Databases / PostgreSQL / Databases*
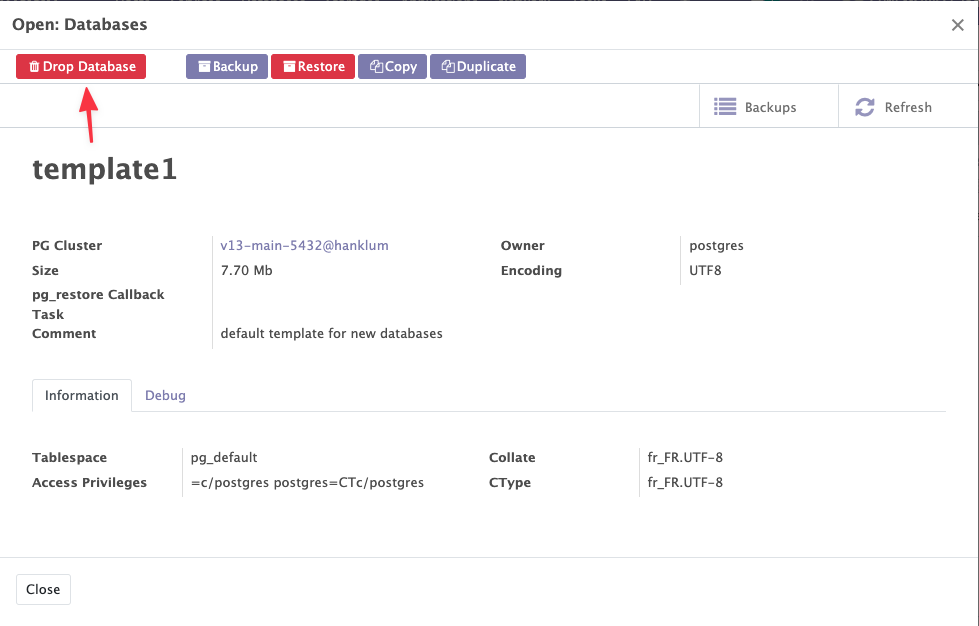
### Who can connect
The database list carries a **PUBLIC** column: it tells you whether every role on the cluster
can connect to that database, which is PostgreSQL's default.
To restrict it, select one or more databases in the list — they must belong to the same
cluster — then use **Grant CONNECT to User…** or **Revoke CONNECT from User…** from the
**Actions** (⚙) menu.
See [CONNECT Privileges](../connect-privileges.md) for the full model.
## Users and roles
!!! warning
In PostgreSQL terms, a USER is a ROLE that has the **LOGIN** attribute.
The **User Roles** tab of a cluster lets you list, create, edit and drop roles.
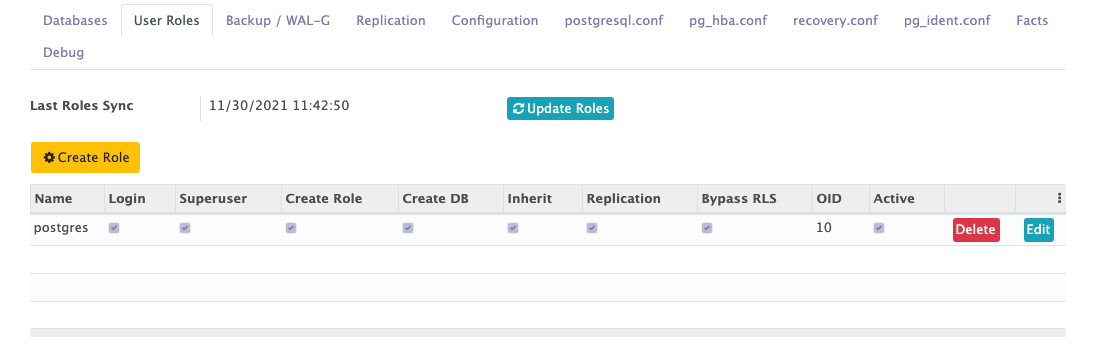
### Listing roles
**Update Roles** refreshes the list from the cluster. Same behaviour as the databases list.
### Creating and editing a role
**Create Role** opens the **Create / Update PostgreSQL Roles** wizard, which builds and runs a
`CREATE ROLE …` statement.
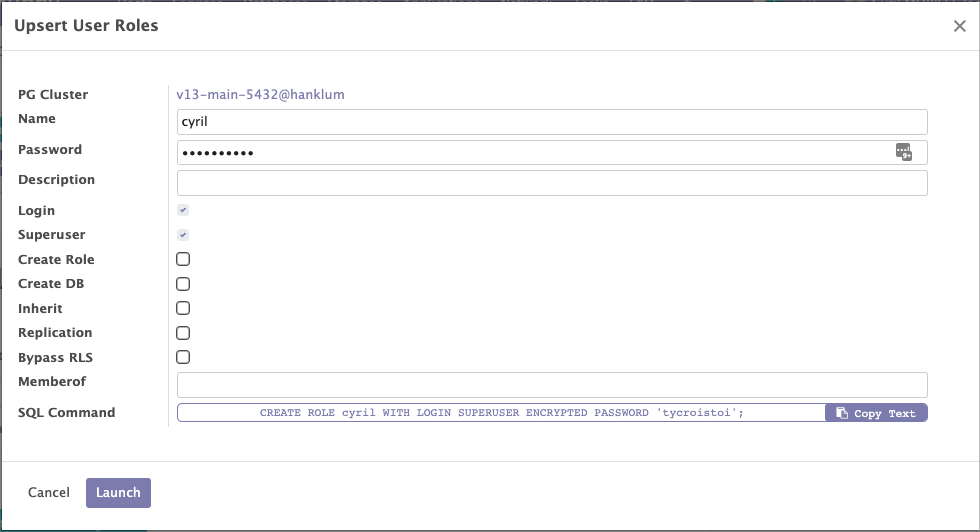
The **Edit** button on each role line opens the same wizard, but it generates an `ALTER ROLE`
statement instead.
### Dropping a role
**Drop**, on each role line, removes the role.
================================================================================
# Overview
Source: guides/postgresql/base/backup-restore/index.md
================================================================================
---
description: Database backups taken with pg_dump
---
# Database Backup, Restore and Copy
Muppy backs up and restores PostgreSQL databases as `pg_dump` archives, and copies databases
between clusters.
Archives are stored in **S3 buckets** — AWS S3 or any compatible object store.
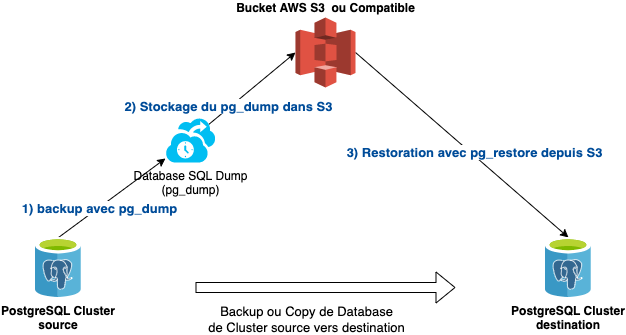
Backups and restores run interactively or on a schedule. Muppy also purges dumps past their
retention period — see [Backup Retention](../backup-retention.md).
**Callback Tasks** let you customise the restore and copy process: run SQL against the database
before restoring, anonymise it right after, and so on. See
[Restore Callbacks](restore-callbacks.md).
Every backup operation runs as a Muppy Task from the script
`muppy_postgresql_base.scripts.pg_dump`, which you can reuse in your own Tasks.
================================================================================
# pg_dump Backups
Source: guides/postgresql/base/backup-restore/pg-dump-backup.md
================================================================================
---
description: The Muppy object that records every PostgreSQL database backup
---
# Database Backups (pg_dump)
Every database backup produces a **Database Backups (pg_dump)** record, listed under *Muppy /
Databases / PostgreSQL* in the menu of the same name.
It holds everything about how the backup went — the dump itself and the S3 transfer — and
everything needed to restore it.
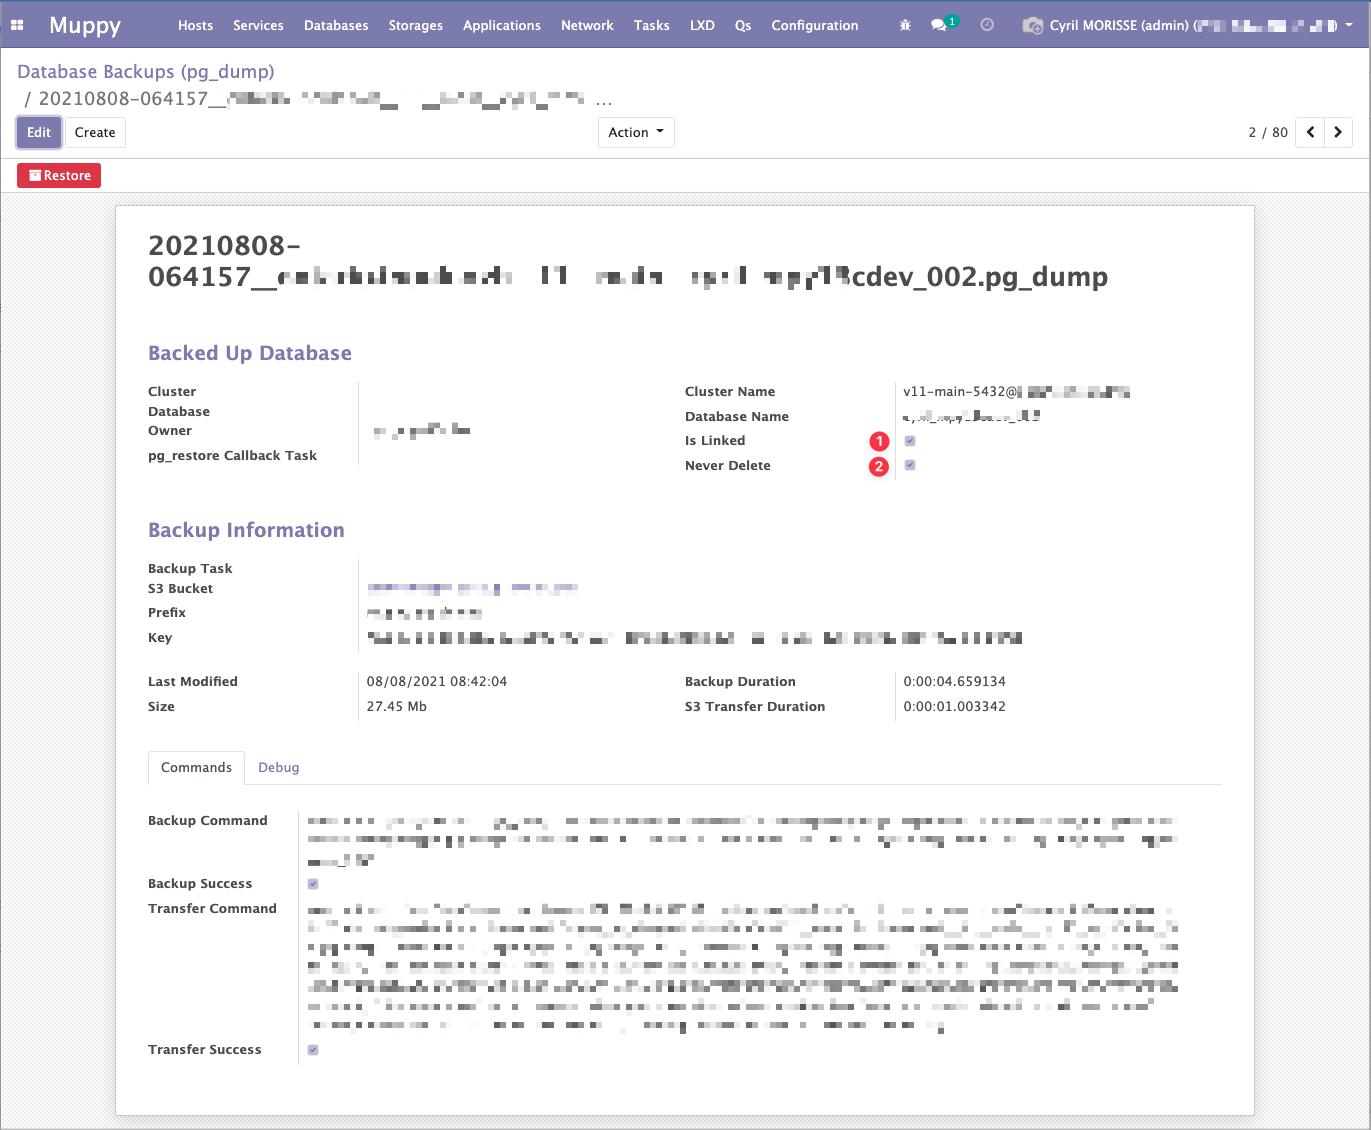
## Fields
Most fields are documented by their own inline help. Two deserve more:
**Is Linked** — the Muppy `pg_dump` record is bound to its S3 object. This is the default, and
it means deleting the Muppy record also deletes the S3 object. Unlink it and deleting the record
leaves the S3 object untouched.
**Never Delete** — off by default. When on, the record cannot be deleted: neither the **Delete**
menu action nor the [retention purge](../backup-retention.md) affects it.
## Downloading a backup
**Generate download URL**, in the form header, issues a time-limited presigned URL for the S3
object. Use it to pull a dump outside Muppy without handing out bucket credentials.
## Indexing the pg_dumps already in a bucket
Muppy stores most of the information needed to restore a dump in the **S3 object's metadata**,
not only in its own database. So one Muppy server can adopt the backups produced by another, as
long as both reach the same bucket.
On the S3 Bucket form, click **Reindex pg_dumps**. The wizard runs a Task that scans the bucket
and creates a `pg_dump` record for every archive it finds.
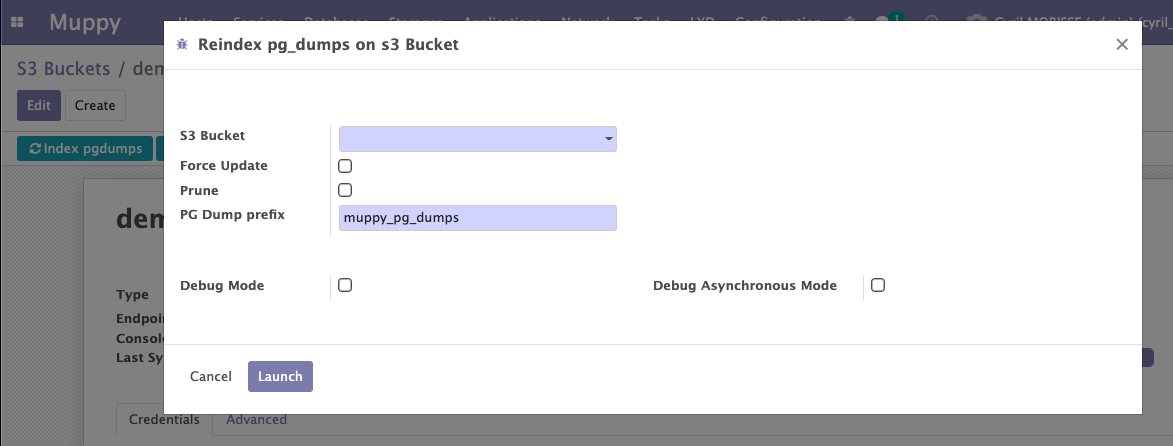
================================================================================
# Restoring Backups
Source: guides/postgresql/base/backup-restore/pg-dump-restore.md
================================================================================
---
description: How to restore a database from a Muppy pg_dump
---
# Restoring Backups
Start a restore from either:
* the pg_dump list — *Muppy / Databases / Database Backups (pg_dump)*
* a PostgreSQL **Database** — from its own menu, or from the **Databases** tab of a
**Database Cluster**
Both open the **Restore PostgreSQL Databases** wizard:
1. Adjust the list of pg_dumps to restore.
2. Pick the target **PostgreSQL Cluster**.
3. Fill in **Owner**, **Jobs**, **Database Comment**, **Database Name** and **Callback Task**.
Each field has inline help.
4. Click **Launch**.
The restore runs in the background as a Task. Follow it under *Muppy / Qs*.
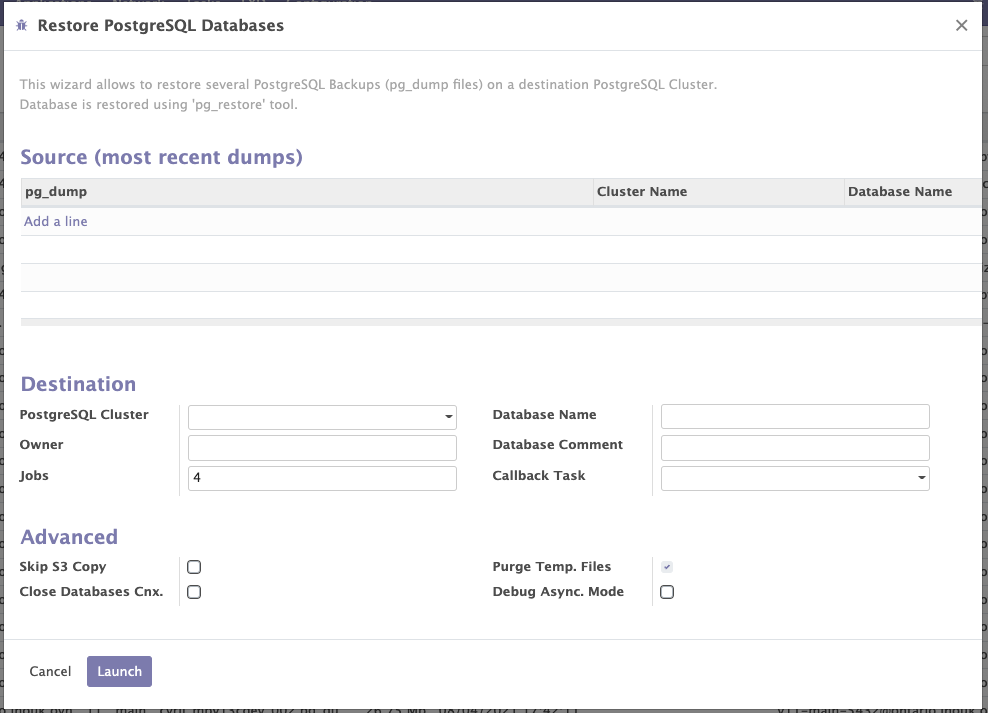
## Advanced options
For large dumps — tens or hundreds of gigabytes — two options save a full transfer:
* **Purge Temp. Files** — off, the dump file is kept on disk after the restore.
* **Skip S3 Copy** — skip the download and reuse a dump file already on disk.
### Close Databases Cnx
Drops every connection to the target database before restoring. Muppy runs:
```sql
ALTER DATABASE {db_name} ALLOW_CONNECTIONS=false;
SELECT pg_terminate_backend(pid) FROM pg_stat_activity WHERE datname='{db_name}';
DROP DATABASE {db_name};
```
Without it, an open session blocks the `DROP DATABASE` and the restore fails.
================================================================================
# Database Copy
Source: guides/postgresql/base/backup-restore/database-copy.md
================================================================================
---
description: How to copy a database between two PostgreSQL clusters
---
# Database Copy
Copying a database between clusters looks like a single operation. Under it, Muppy chains:
1. **Backup** one or more databases on the source cluster.
2. Upload the pg_dumps from the source Host to an **S3 bucket**.
3. Download them onto the Host running the target cluster.
4. **Restore** them there.
5. Delete the temporary files.
## Starting a copy
Three entry points:
* the **Actions** (⚙) menu of the database list (*Muppy / Databases / Databases*), once at
least one database is selected
* the **Databases** tab of a **Database Cluster**, via **Copy Databases**
* a database form, via **Copy**
All three open the **Copy Databases (using pg_dump)** wizard:
1. Pick the S3 bucket that will hold the pg_dumps.
2. Adjust the list of databases to copy.
3. Optionally pick a **pg_restore Callback Task**, applied to every database in the list.
4. Click **Launch**.
The copy runs in the background as a Task. Follow it under *Muppy / Qs*.
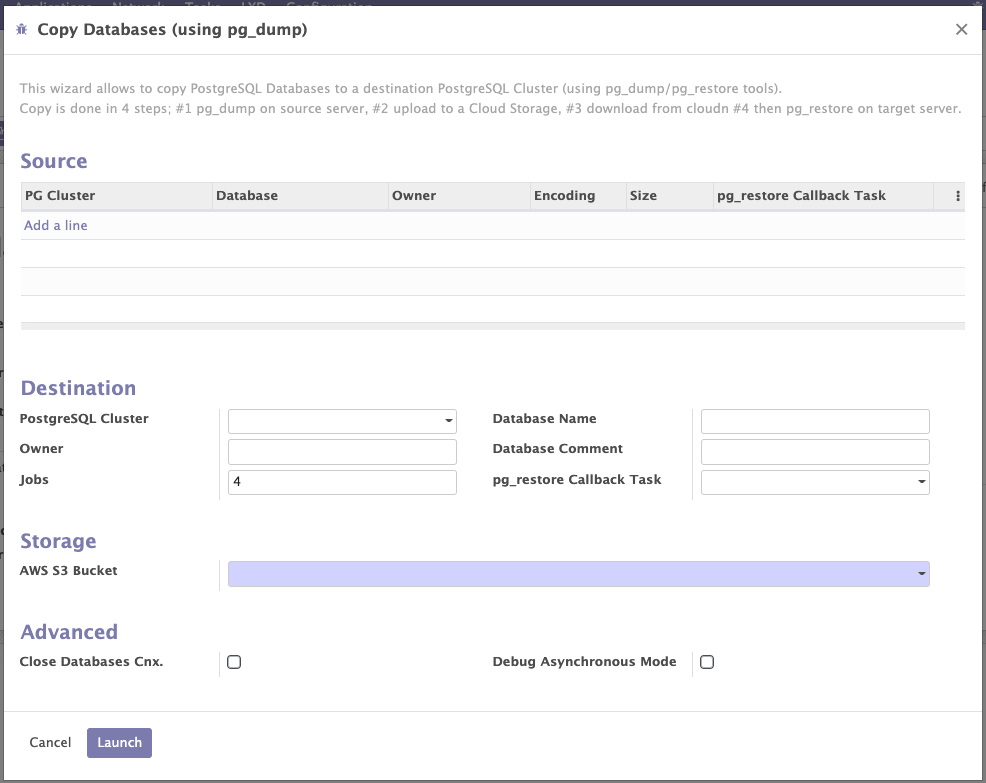
The available options are a mix of the backup and restore options.
================================================================================
# Full Backups
Source: guides/postgresql/base/backup-restore/full-backup.md
================================================================================
---
description: How to back up one or more PostgreSQL databases with Muppy
---
# Full Backups
Start a backup from either:
* the **Databases** tab of a **Database Cluster**, via **Backup Databases**
* a database form, via **Backup**
Both open the **Backup Databases** wizard:
1. Pick the S3 bucket that will hold the pg_dumps.
2. Adjust the list of databases to back up.
3. Optionally pick a **pg_restore Callback Task**.
4. Click **Launch**.
The backup runs in the background as a Task. Follow it under *Muppy / Qs*.

!!! info
Hover over a field label for a second to see its inline help.
To run this on a schedule instead, see [Scheduled Backups](../scheduled-backups.md).
================================================================================
# Restore Callbacks
Source: guides/postgresql/base/backup-restore/restore-callbacks.md
================================================================================
# pg_restore Callback Tasks
!!! tip "Writing callbacks in Shell"
PG restore callbacks can also be written as shell scripts (Jinja2 bash templates), without deploying a Python addon. See [Shell Restore Callbacks](shell-restore-callbacks.md).
## What they are
A **pg_restore Callback Task** hooks into the restore process. Muppy calls it at each step, so
you can act between them.
Typical uses:
* adjust a user's attributes right after it is created
* alter the schema after the database is created and before the data goes in
* anonymise a database immediately after restoring it
A callback is an ordinary Muppy Task with a specific signature. Its **`step`** parameter tells
it which step just finished: `s3_download`, `create_user`, `drop_db`, `create_db` or
`pg_restore`.
### Template
```python
@fabric_task()
def template_pg_restore_callback(
cnx, host_obj,
step:str,
pg_cluster_obj:OdooModelType,
pg_dump_obj:OdooModelType=None,
pg_dump_file_path:str=None,
db_name:str=None,
db_comment:str=None,
db_owner:str=None,
_imq_logger=None
):
""" Template pg_restore callback
:param step: The pg_restore step whose end triggered this task:
any of 's3_download', 'create_user', 'drop_db', 'create_db', 'pg_restore'.
:param pg_cluster_obj: Cluster on which the dump will be restored.
:param pg_dump_obj: The Muppy pg_dump object that will be restored.
:param pg_dump_file_path: Full path of the pg_dump that will be restored.
:param db_name: Name of the database to restore.
:param db_comment: Comment that will be set at restore.
:param db_owner: User owner of the database.
:returns: something or False
"""
odoo_env = host_obj.env
_task_logger = _imq_logger or _logger
# ...
```
The task is called once per step. Branch on `step` and return early for the steps you don't
care about.
## Where a callback is set
A callback can be attached at four levels. Each one is a default for the next:
| Set on | Effect |
|---|---|
| **PostgreSQL Database** | Default proposed in the **Backup Databases** wizard. |
| **Backup Databases** wizard | Stored on the resulting `pg_dump`, and proposed as the default when that dump is restored. |
| **Restore PostgreSQL Databases** wizard | Overrides the dump's callback for this restore. Leave it empty to use the dump's. |
| **Copy Databases (using pg_dump)** wizard | The callback used for the restore half of the copy. |
================================================================================
# Shell Restore Callbacks
Source: guides/postgresql/base/backup-restore/shell-restore-callbacks.md
================================================================================
# Shell Restore Callbacks
!!! info "Related guide"
This page covers shell script callbacks specifically. For Python callbacks and the general callback mechanism, see [Restore Callbacks](restore-callbacks.md).
## When to Use a Shell Callback
Write your pg_restore callback as a **shell script** when:
- Your post-restore logic is a few lines of SQL, a `psql` command, or a `curl` call
- You have an existing bash script you want to reuse
- You want to avoid the burden of maintaining deploying a new Muppy addon just for post-restore automation (Enterprise Customer Only)
Write your callback in **Python** (`@fabric_task`) when:
- You need complex branching logic
- You need Odoo ORM access (reading/writing Muppy ORM Objects inside the callback)
- The callback coordinates multiple tasks or services
---
## How It Works
A shell callback is a `mpy.task` record with `Task Type = Shell Script` and `Category = PG Restore Callback`.
At each restore step, Muppy:
1. Renders your `Shell Script Template` (Jinja2) with the current restore context
3. Uploads the rendered script to the target host
4. Executes it as `shell_script_username` via `sudo su - -c 'bash